
Sign up and choose your Pack
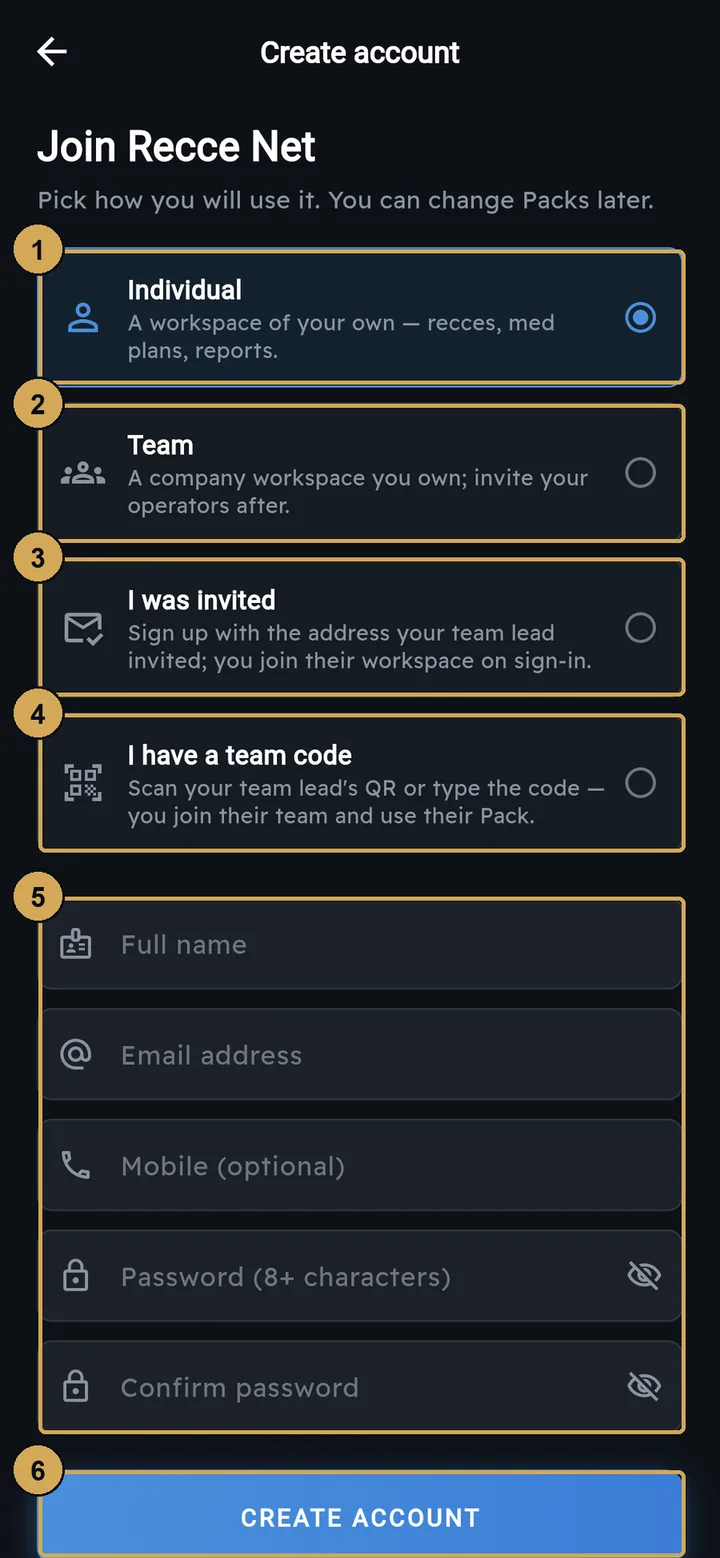
Download the app, or open app.reccenet.com in a browser, and tap Sign up. Choose Individual. This gives you a workspace of your own. Then enter your name, email, mobile (optional) and a password.
 (opens the full-size screenshot)
Sign-up starts by choosing how you will use Recce Net. For a workspace of your own, pick Individual.
- 1: Individual – a workspace of your own
- 2: Team – a company workspace you own
- 3: Invited by email – join your team lead’s workspace
- 4: Have a team code – scan the QR or type the code
- 5: Your details and password
- 6: Create account
 (opens the full-size screenshot)
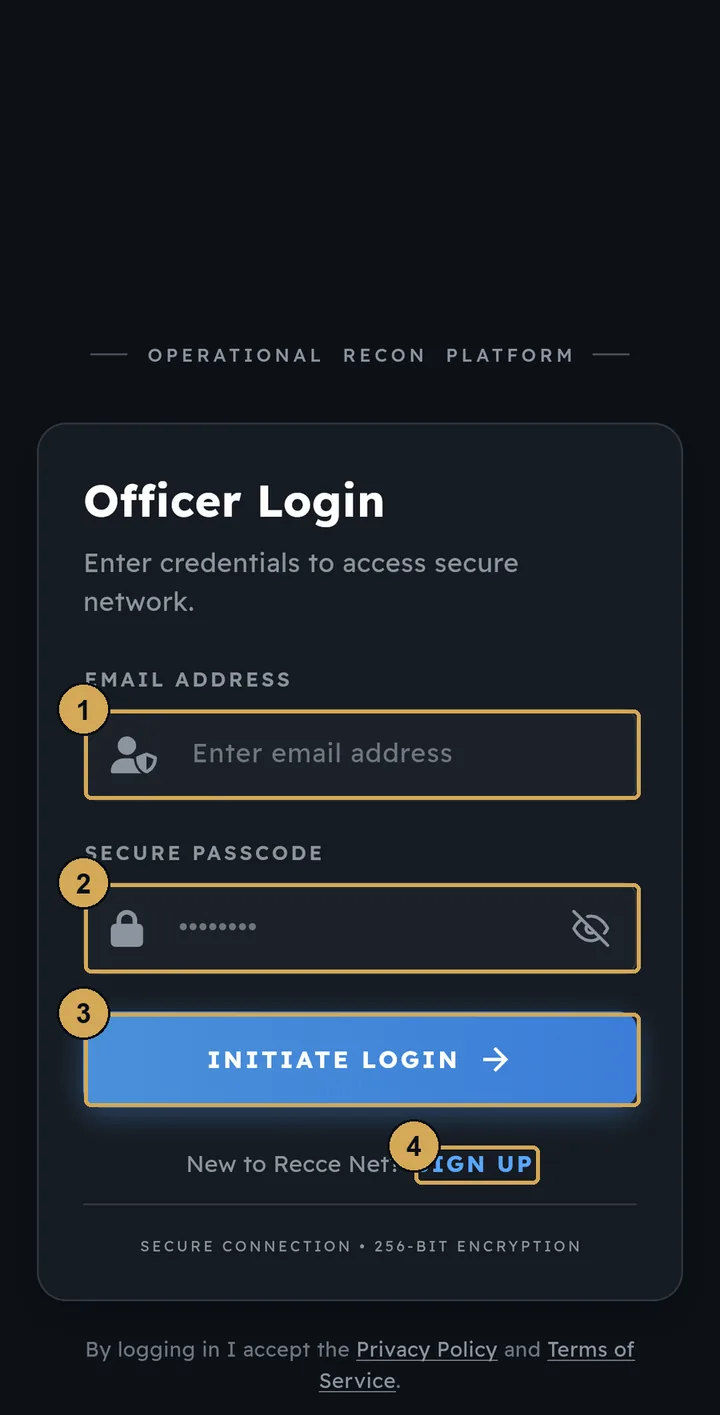
After that, you sign in with the same email and password on any device.
- 1: Your email address
- 2: Your passcode
- 3: Sign in
- 4: New users sign up here
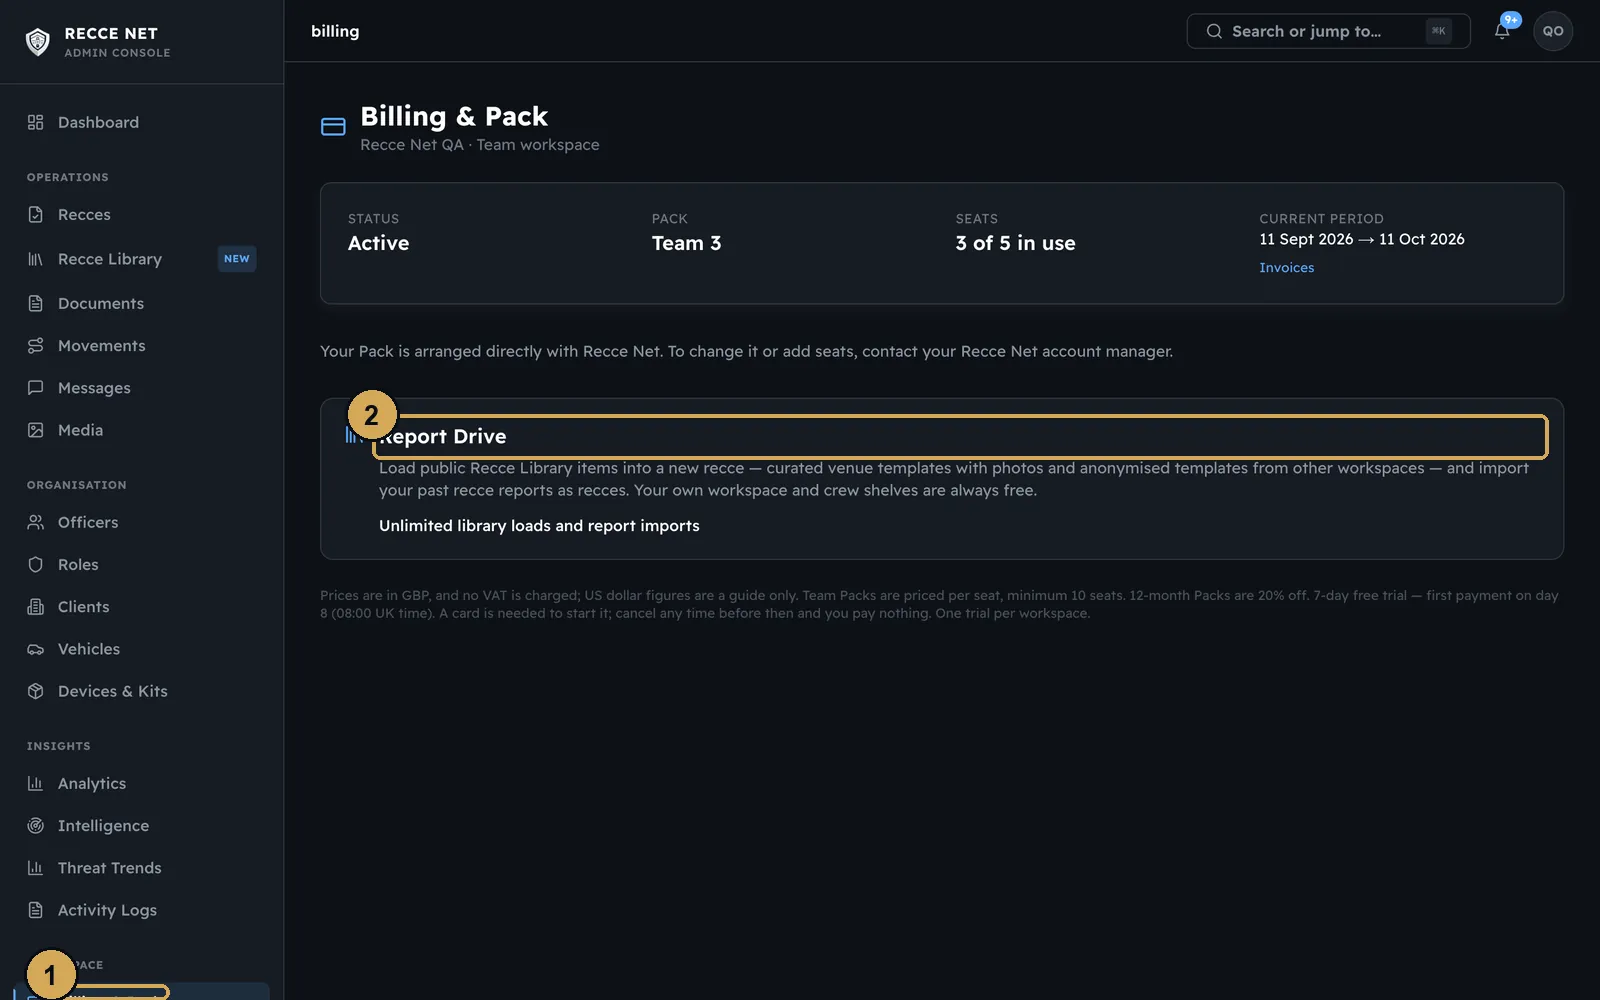
Next, the app asks you to choose your Pack. Checkout opens securely in your browser, and the app unlocks as soon as you finish. Every Pack starts with a 7-day free trial, and the first payment is taken on day 8. You can see and change your Pack at any time on the Billing page of the console at admin.reccenet.com. Compare the Packs on the pricing page.
 (opens the full-size screenshot)
Your Pack, allowance and the Report Drive add-on, on the Billing page of the console.
- 1: Your Pack
- 2: Report Drive add-on
Your profile and ID
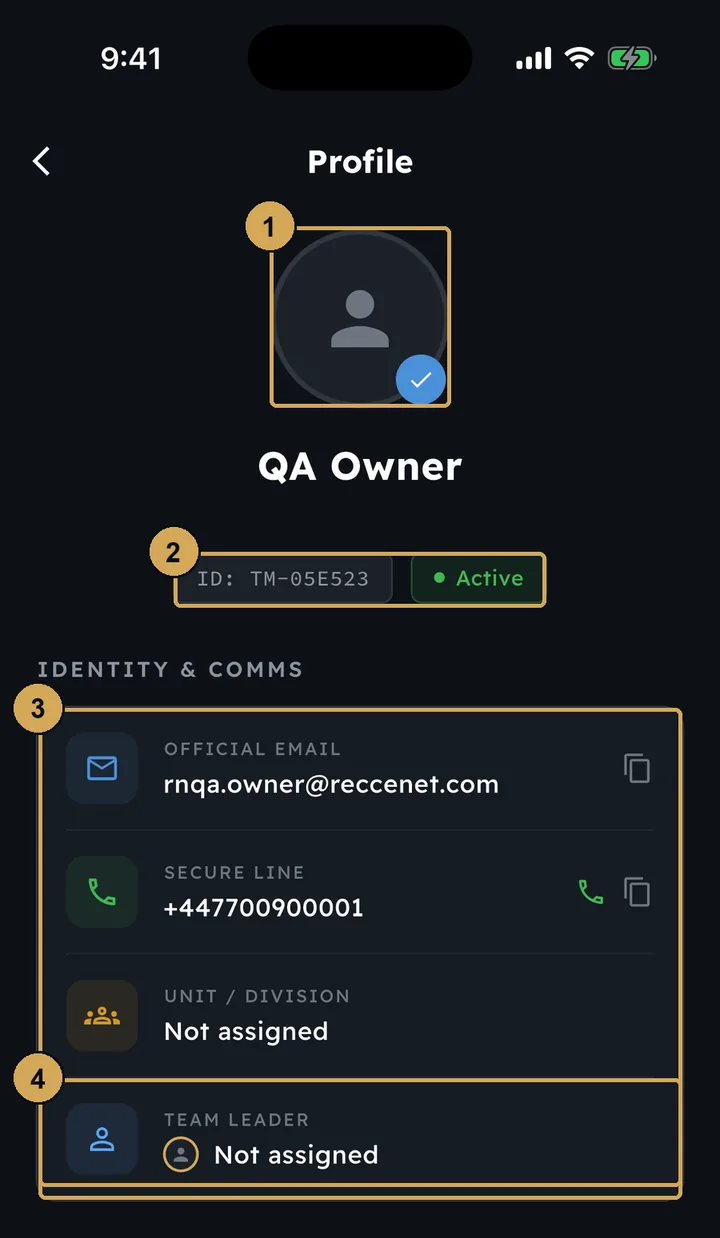
After the Pack, the app asks you to verify your identity. Upload your driving licence, and a business card if you have one. You can skip this step and do it later from your profile. Once your ID is approved in the console, your profile shows the verified badge.
 (opens the full-size screenshot)
Your profile once your identity is verified: the badge, your ID and your contact details.
- 1: Verified profile photo
- 2: Your ID and account status
- 3: Identity and contact details
- 4: Your team leader
Tap your name at the top of the side menu to open your profile. It shows your ID, account status, contact details and team leader.
The dashboard
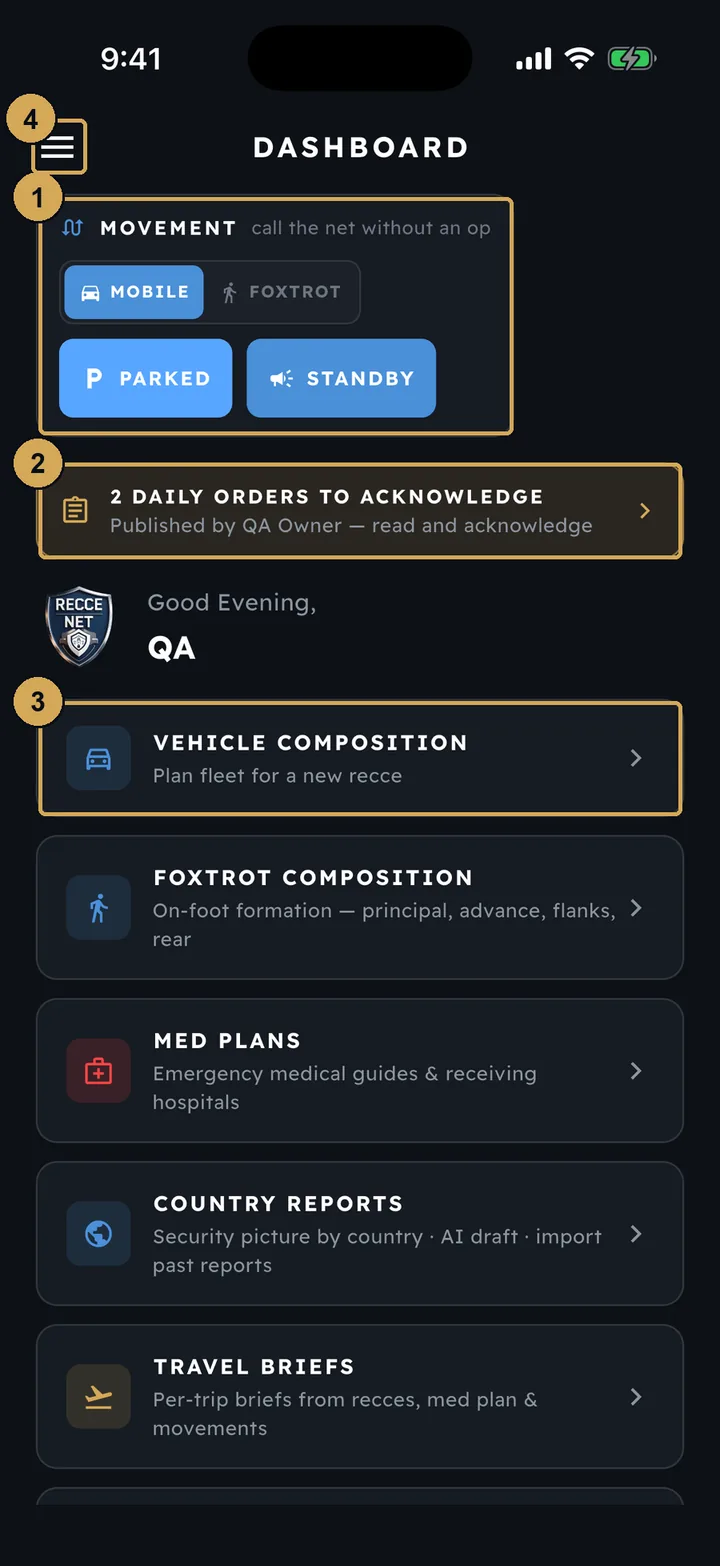
The dashboard is your home screen. At the top you set your movement status and see any daily orders waiting for you. Below that are tiles for compositions, med plans, country reports and travel briefs. Further down are the Recce Library, Rapid Recce and Start New Recce.
 (opens the full-size screenshot)
The dashboard is home. Everything you use day to day is one tap from here.
- 1: Movement status: Mobile or Foxtrot, Parked, Standby
- 2: Daily orders waiting for you to acknowledge
- 3: Quick-access tiles for each tool
- 4: Open the side menu
 (opens the full-size screenshot)
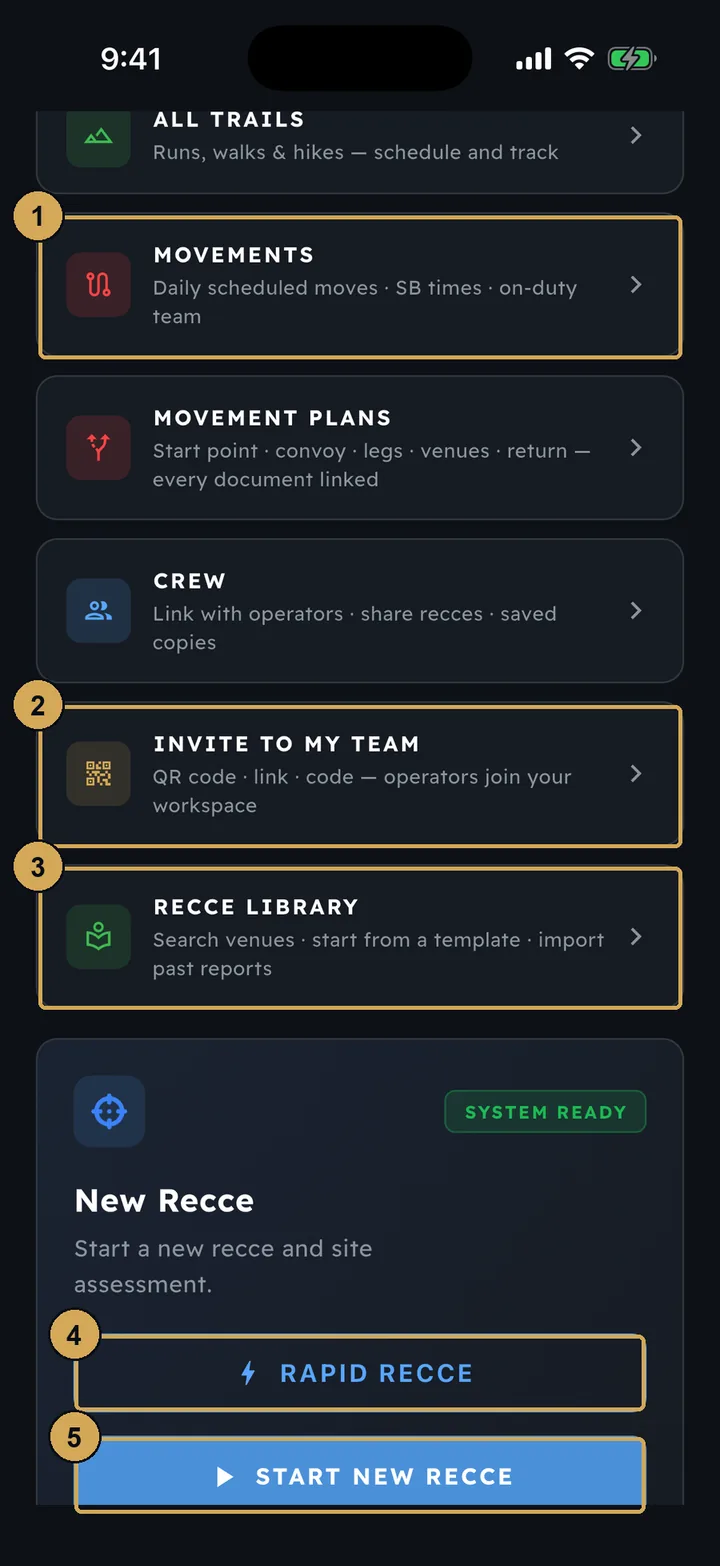
Further down: movements, the Recce Library, Rapid Recce and Start New Recce.
- 1: Movements – daily scheduled moves
- 2: Invite operators to your team (team leads)
- 3: Recce Library
- 4: Rapid Recce – drop-off, entrance, pick-up with photos
- 5: Start a full ten-step recce
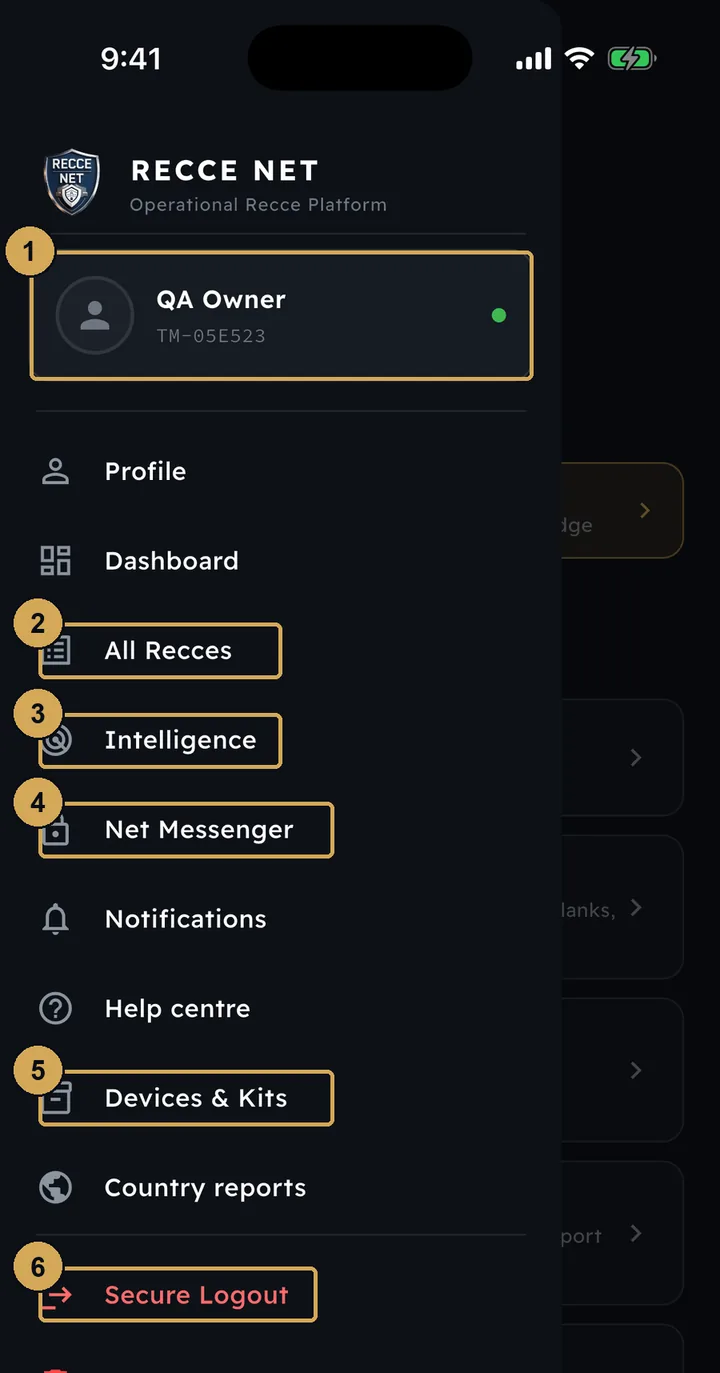
The side menu (the three lines at the top left) holds All Recces, Intelligence, Net Messenger, Devices & Kits, your profile and Secure Logout.
 (opens the full-size screenshot)
The side menu holds everything else, including your profile and Secure Logout.
- 1: Your name and ID – tap for your profile
- 2: All Recces
- 3: Intelligence
- 4: Net Messenger
- 5: Devices & Kits
- 6: Secure Logout
A new recce in ten steps
Start New Recce opens the recce in ten steps. The steps are always in the same order. Tap any tab to jump to that step, and use Save draft to come back later. Opening a draft picks up exactly where you left off.
- 1Brief
- 2Location & Mapping
- 3Route
- 4Access
- 5Emergency
- 6Threat
- 7Vehicles
- 8Team
- 9Foxtrot (optional)
- 10Review & submit
The same ten steps every time, so a reviewer always knows where to look.
Brief
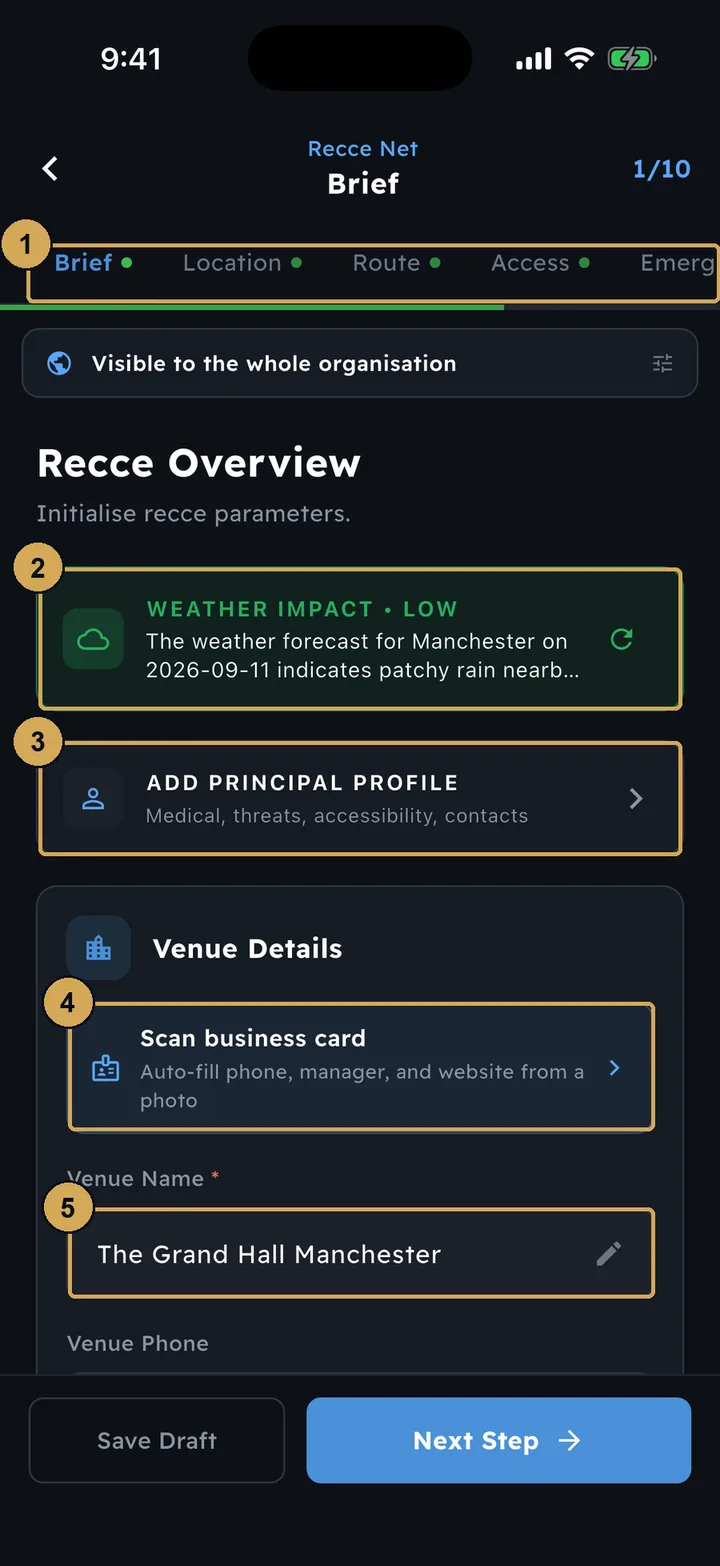
The venue name (required), the date, and the principal’s profile. The weather impact for the day appears automatically. Scan a business card to fill in the venue details, or hold the mic to dictate instead of typing.
 (opens the full-size screenshot)
Step 1, Brief: the venue, the principal and the weather for the day.
- 1: Ten steps – tap any tab to jump
- 2: Automatic weather impact for the date
- 3: Add the principal profile
- 4: Scan a business card to fill venue details
- 5: Venue name (required)
Location & Mapping
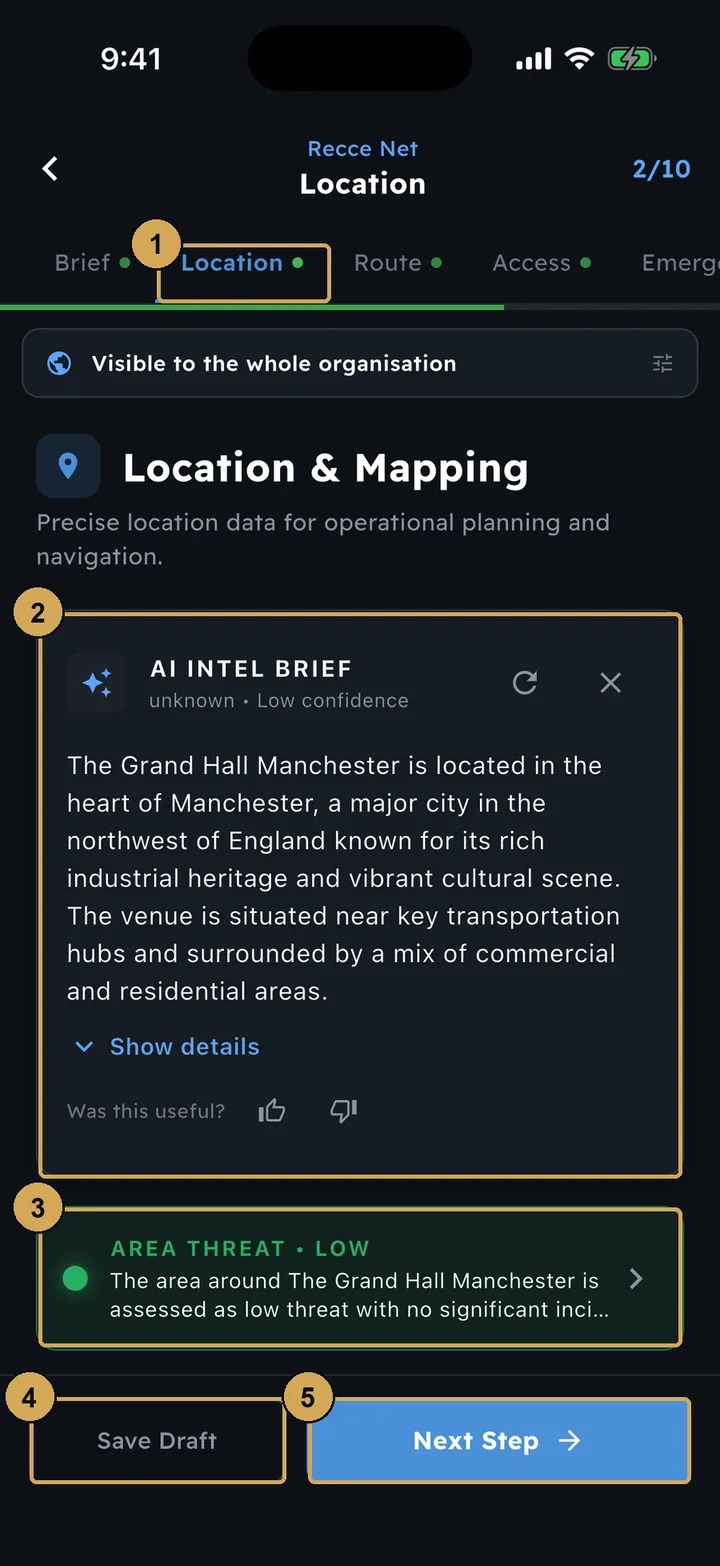
Pin the venue on the map. The app gives you an AI intel brief for the area and an area threat level. Tap the threat level for the detail.
 (opens the full-size screenshot)
Step 2, Location & Mapping: pin the venue and read the area brief and threat level.
- 1: Current step (2 of 10)
- 2: AI intel brief for the area
- 3: Area threat level – tap for detail
- 4: Save draft and come back later
- 5: Next step
Route
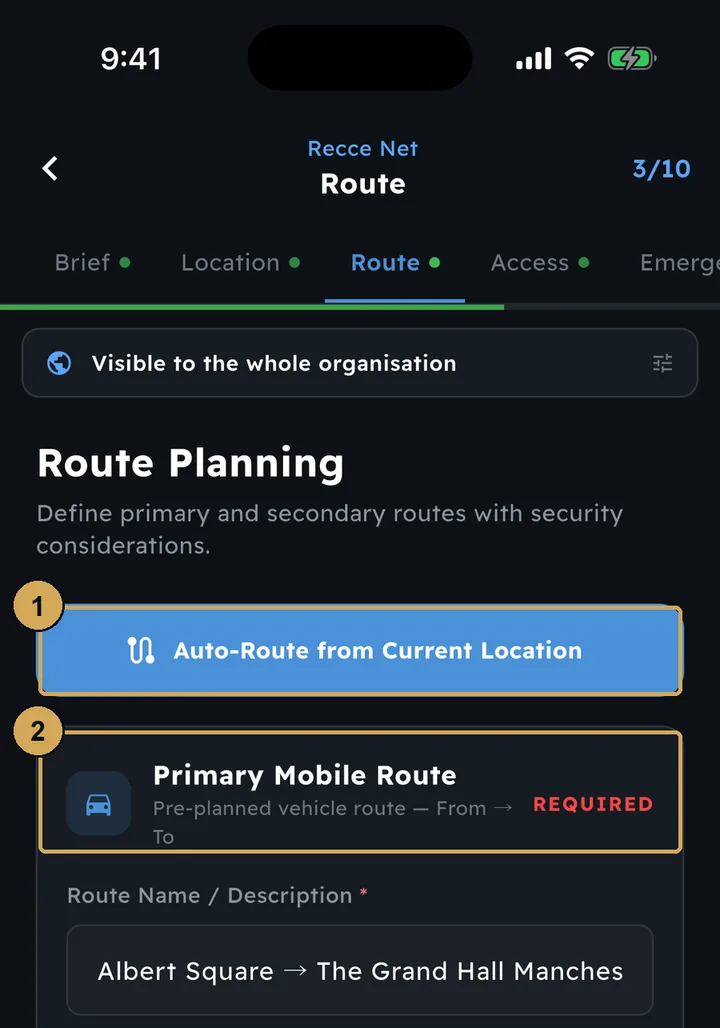
The primary route is required and a secondary route is optional. Pick the start point on a map, or tap auto-route to plan it from where you are standing.
 (opens the full-size screenshot)
Step 3, Route: plan the primary and secondary routes, or auto-route from where you stand.
- 1: Auto-route from your current location
- 2: Primary mobile route (required)
Access
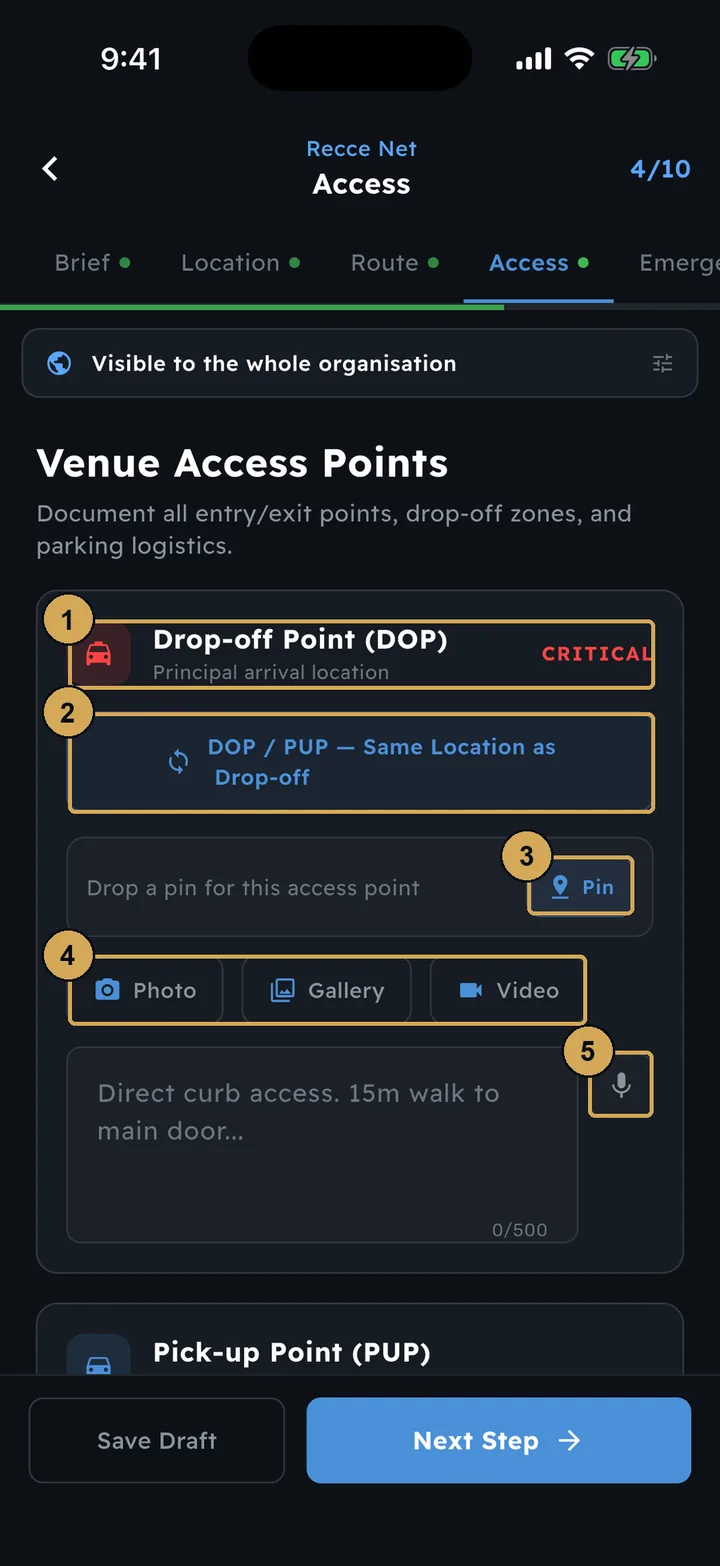
Record every access point: drop-off, main entrance, pick-up and parking. Give each one a map pin, photos or video, and a voice note. Mark the critical ones.
 (opens the full-size screenshot)
Step 4, Access: each access point with a pin, photos, video and voice notes.
- 1: Drop-off point, marked critical
- 2: Pick-up is the same place as drop-off
- 3: Drop a pin on the map
- 4: Add photos, gallery images or video
- 5: Dictate notes by voice
Emergency
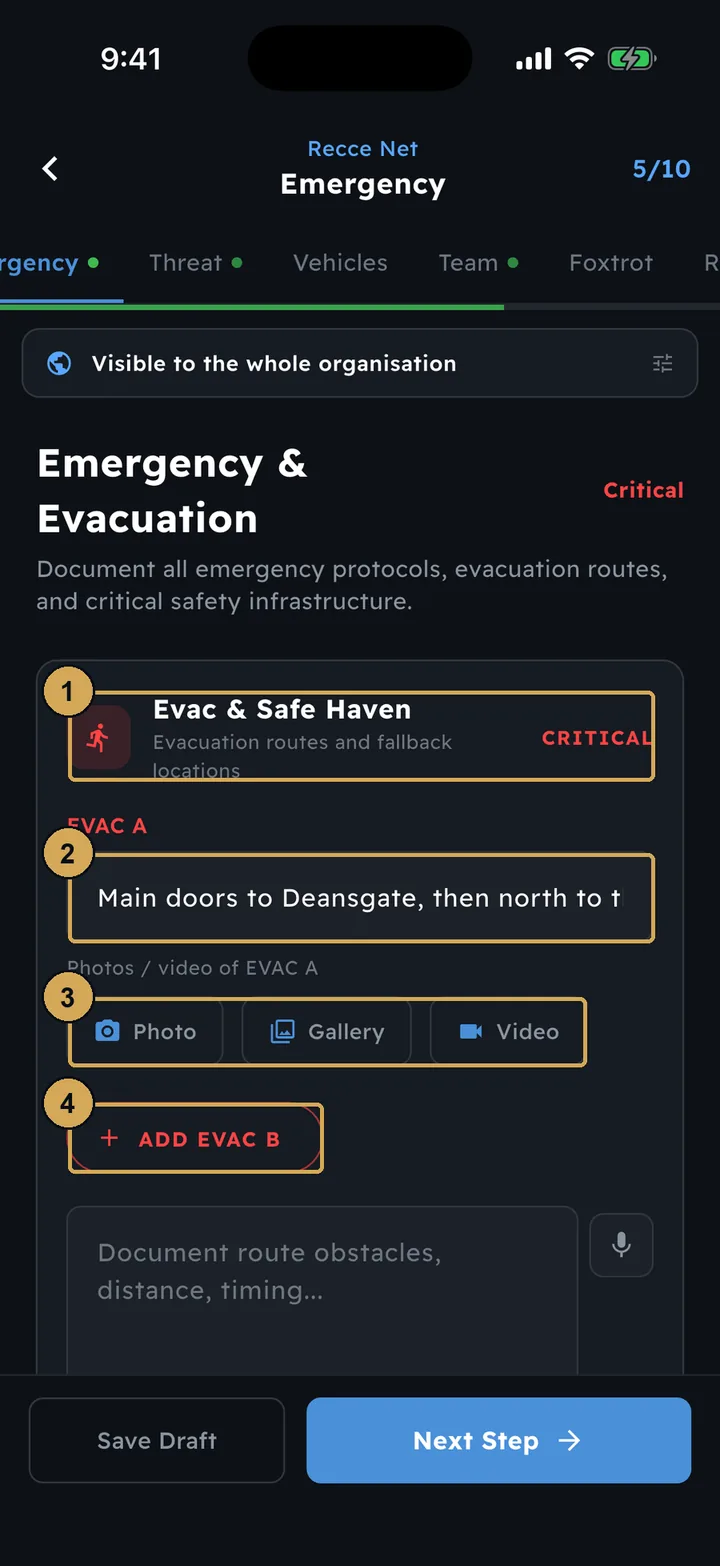
Evacuation routes, with a photo or video of each one, safe havens, and the critical safety details.
 (opens the full-size screenshot)
Step 5, Emergency: evacuation routes, safe havens and the safety details.
- 1: Evac routes and safe haven
- 2: Evac route A
- 3: Photo or video of the route
- 4: Add a second evac route
Threat
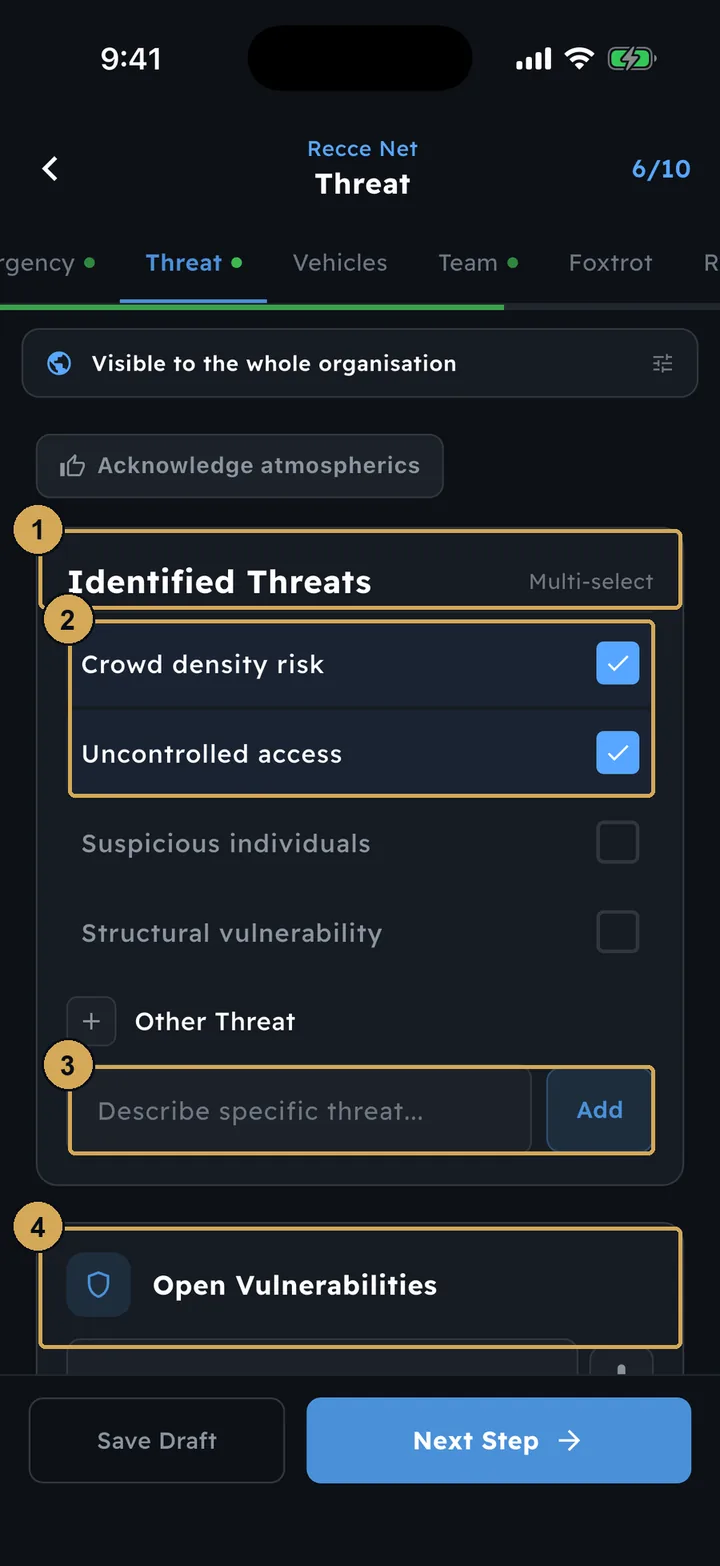
Tick the threats you saw from the list, add any of your own, and record the vulnerabilities that are still open.
 (opens the full-size screenshot)
Step 6, Threat: tick what you saw, add your own and record open vulnerabilities.
- 1: Identified threats – pick all that apply
- 2: Selected threats
- 3: Add a threat of your own
- 4: Open vulnerabilities
Vehicles
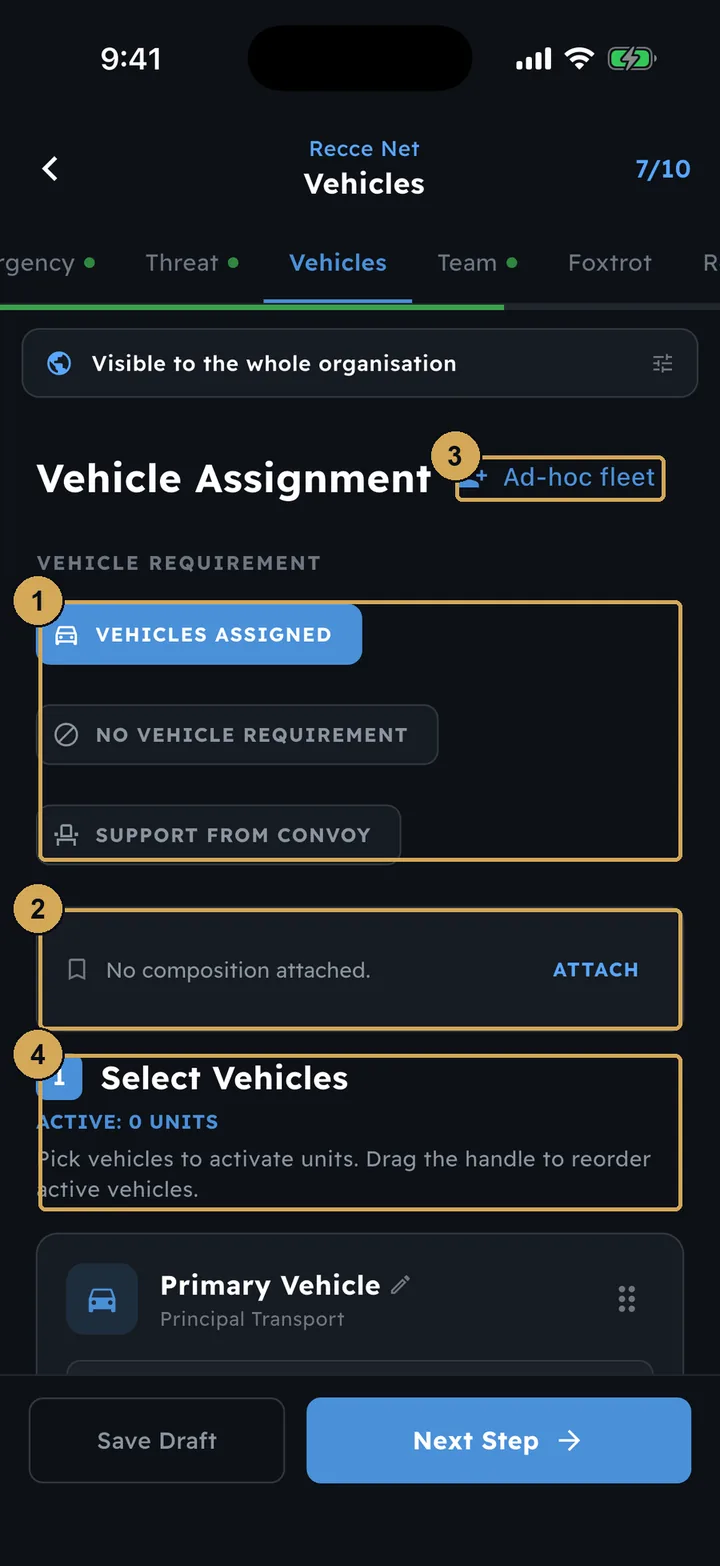
Set the vehicle requirement: assigned, none, or convoy support. Then attach a saved vehicle composition, or add the vehicles for this move and put them in order.
 (opens the full-size screenshot)
Step 7, Vehicles: set the requirement and attach a saved vehicle composition.
- 1: Vehicle requirement: assigned, none, or convoy support
- 2: Attach a saved vehicle composition
- 3: Add an ad-hoc fleet
- 4: Select and reorder the vehicles
Team
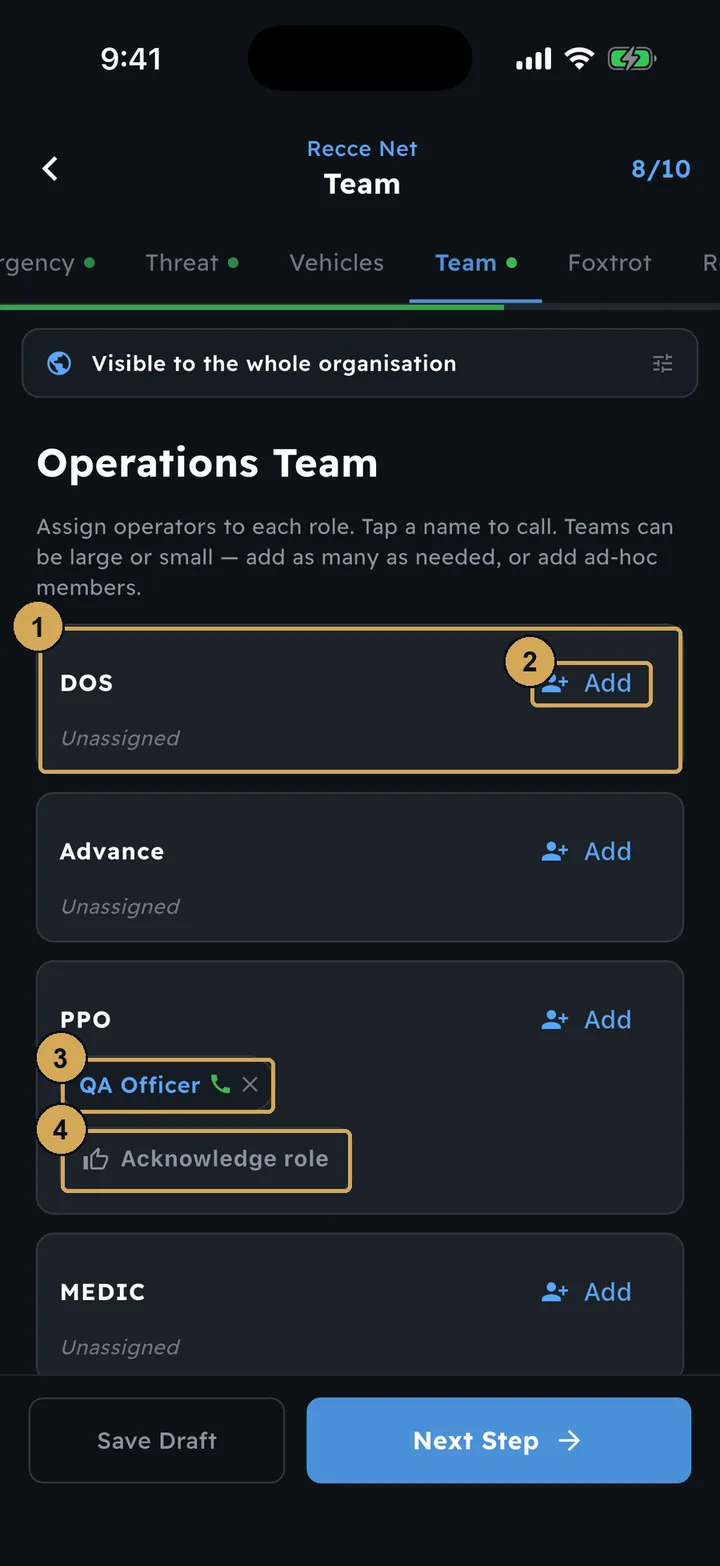
Put a person in each role, such as DOS, Advance, PPO or Medic. Each person acknowledges their role on their own phone.
 (opens the full-size screenshot)
Step 8, Team: put people in each role; they acknowledge it on their own phones.
- 1: A role on the team
- 2: Add an operator to the role
- 3: Assigned operator – tap to call
- 4: Operator acknowledges the role
Foxtrot (optional)
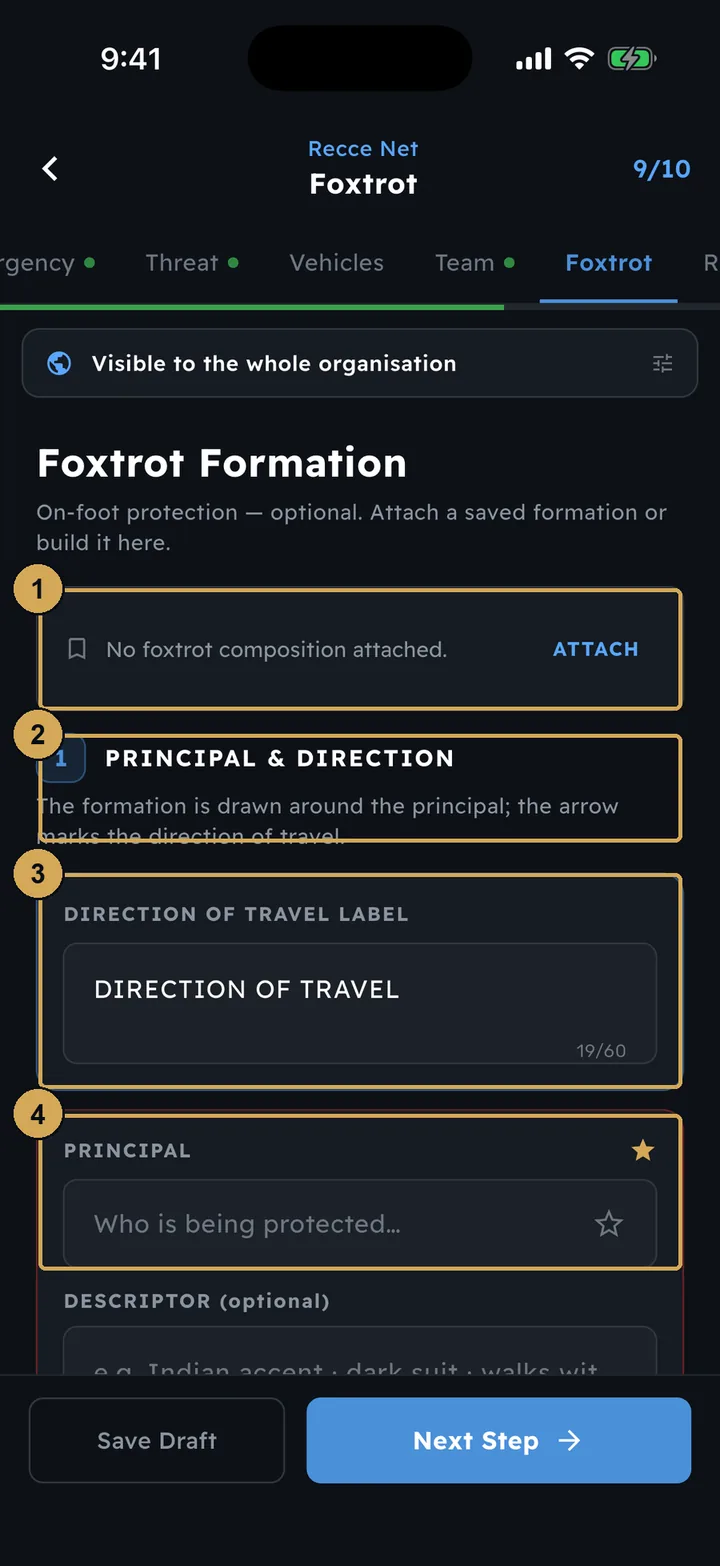
If the move is on foot, plan the formation around the principal, or attach a saved foxtrot composition.
 (opens the full-size screenshot)
Step 9, Foxtrot (optional): the on-foot formation around the principal.
- 1: Attach a saved foxtrot formation
- 2: Build it here, starting with the principal
- 3: Label the direction of travel
- 4: Who is being protected
Review & submit
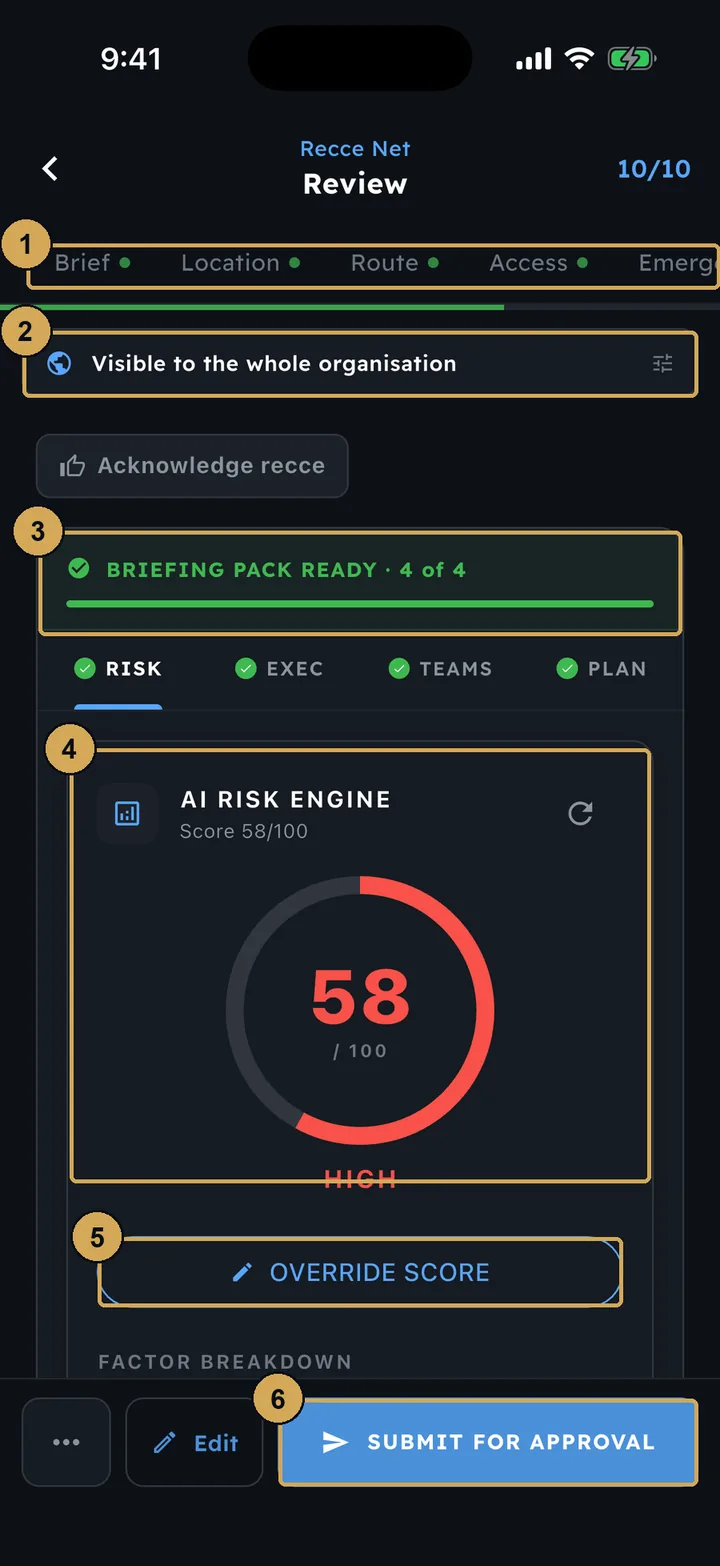
Check the briefing pack and the AI risk score out of 100. If you disagree with the score, override it with your own judgement. Then tap Submit for approval.
 (opens the full-size screenshot)
Step 10, Review: check the briefing pack and the AI risk score, then submit.
- 1: Step tabs – jump back to any section
- 2: Who can see this recce
- 3: Briefing pack: Risk, Exec, Teams, Plan
- 4: AI risk score out of 100
- 5: Override the score with your own judgement
- 6: Submit for approval
How the AI reached its score
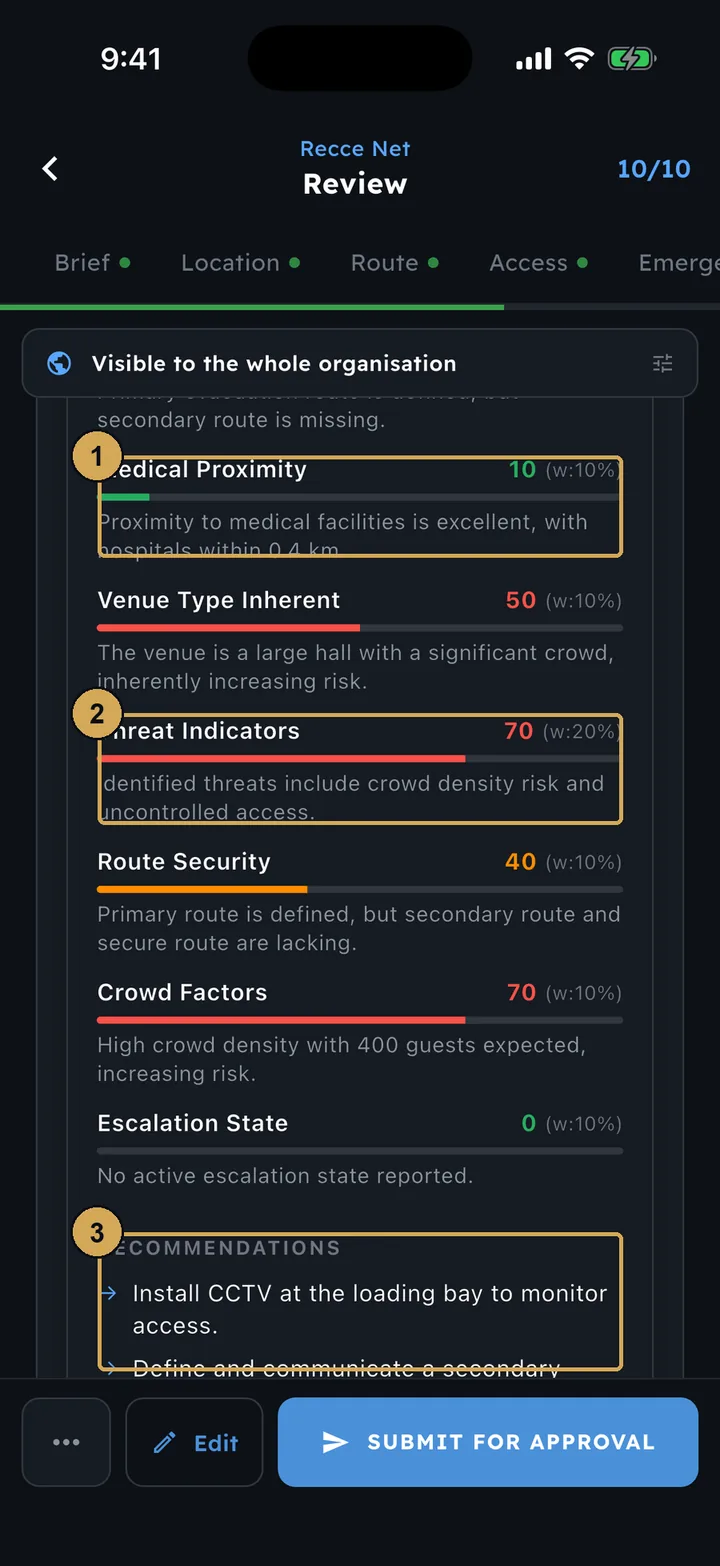
Tap the score to see each factor with its weighting, a plain-English reason, and recommendations to lower the risk.
 (opens the full-size screenshot)
How the AI reached its score, factor by factor, with recommendations.
- 1: Each factor scored 0–100 with its weighting
- 2: Plain-English reason for the score
- 3: AI recommendations to reduce the risk
Approving your own recce
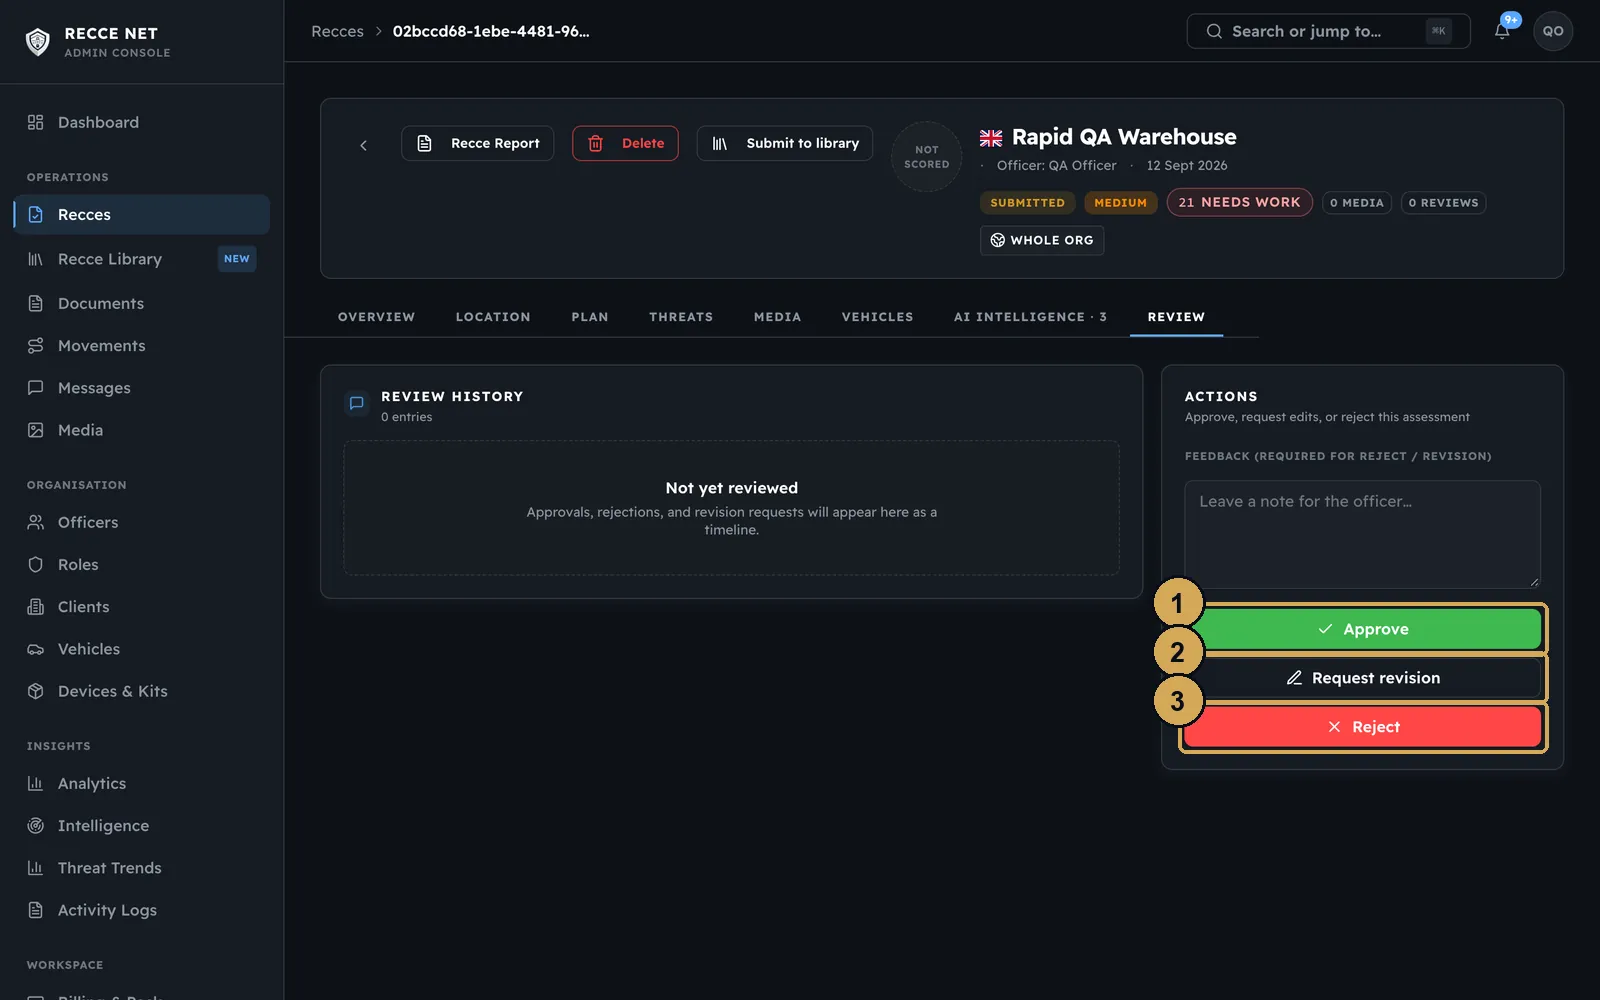
An Individual workspace has one person in it, so you approve your own recces. Sign in to the console at admin.reccenet.com, open the recce and go to the Review tab. From there you can approve it, send it back for a revision, or reject it with a reason.
 (opens the full-size screenshot)
In an Individual workspace you approve your own recces, from the Review tab in the console.
- 1: Approve
- 2: Send back for a revision
- 3: Reject (a reason is required)
Working with no signal
You can carry on recording with no signal. Photos, notes and photo edits are saved on the phone, and uploads are queued and retried. Features that need AI are greyed out until you are back online.
Quick Look and Rapid Recce
Sometimes you only need the essentials. Tap the QUICK LOOK chip on a recce card to see the drop-off point, main entrance and pick-up point on one screen, with their photos and a Navigate button for each. The vehicle staging area, evacuation, safe zone and medical details sit in a More row underneath. Quick Look opens instantly, even offline. You can share it as text to paste into WhatsApp, or as a PDF.
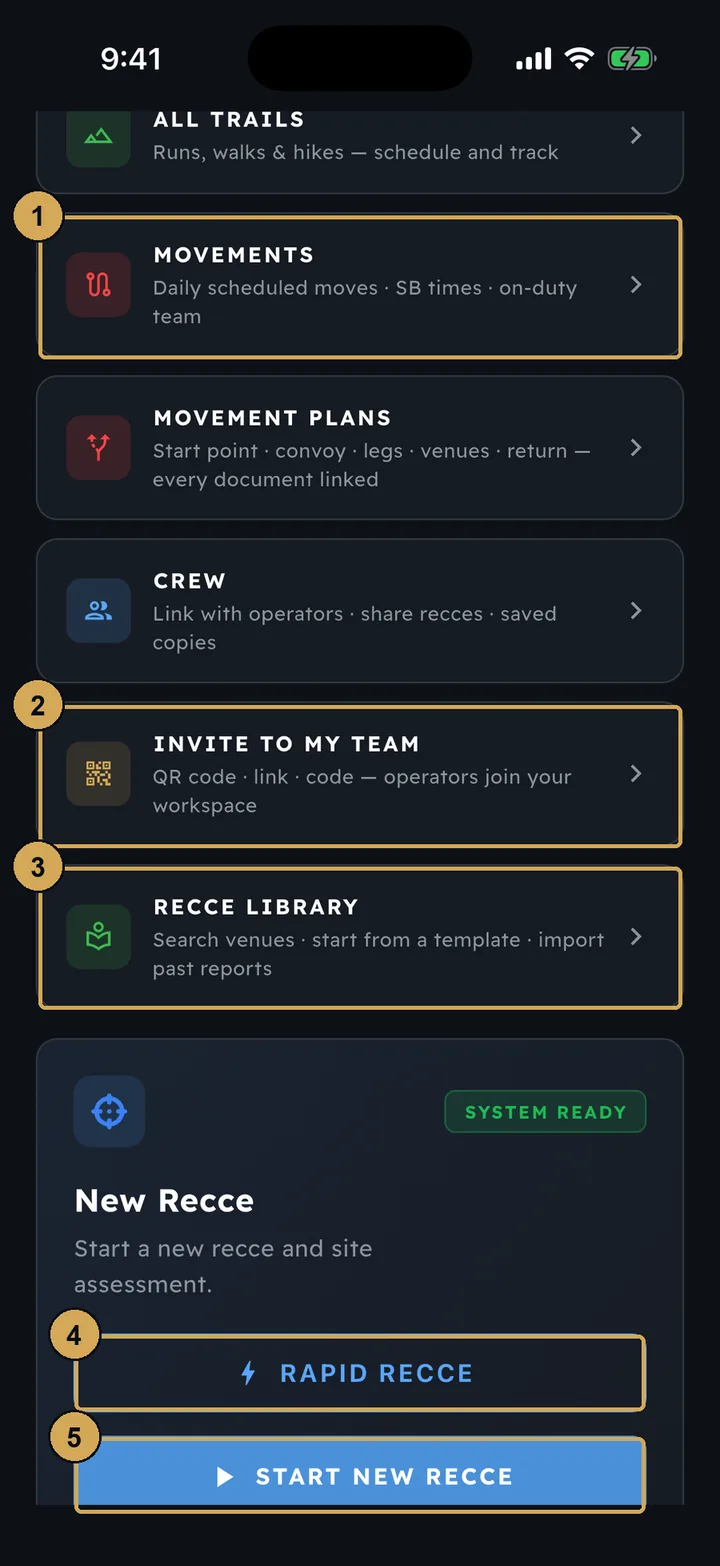
When time is really short, use the Rapid Recce panel on the dashboard. On one screen, record the venue, your position, three photos and a spoken or typed note. You can turn it into a full ten-step draft later, with your note sorted into the right steps.
 (opens the full-size screenshot)
Rapid Recce (callout 4): the drop-off, entrance and pick-up, with photos, on one screen.
- 1: Movements – daily scheduled moves
- 2: Invite operators to your team (team leads)
- 3: Recce Library
- 4: Rapid Recce – drop-off, entrance, pick-up with photos
- 5: Start a full ten-step recce
Export and share
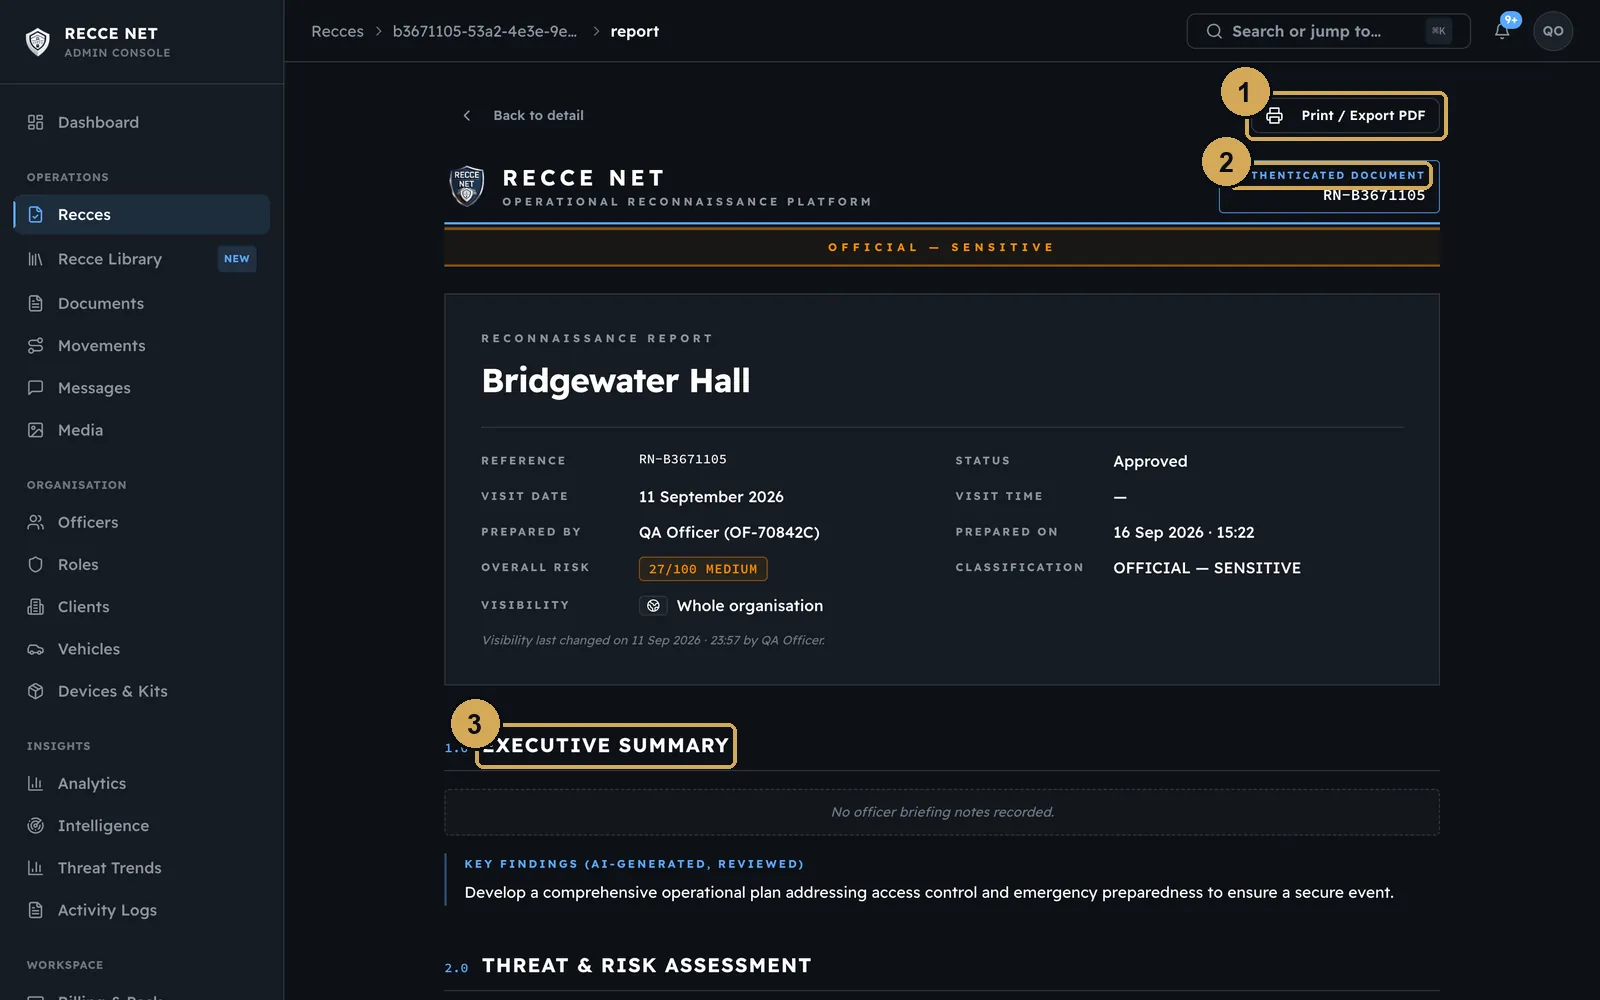
Once a recce is approved, export it from the app as a PDF or as a PowerPoint brief for the team. In the console, open the recce and then its report to print it or save it as a PDF. Every report carries its own reference number.
 (opens the full-size screenshot)
The finished report, with its own reference number, ready to print or save as a PDF.
- 1: Print or save as PDF
- 2: Unique report reference
- 3: Numbered report sections
The Recce Library
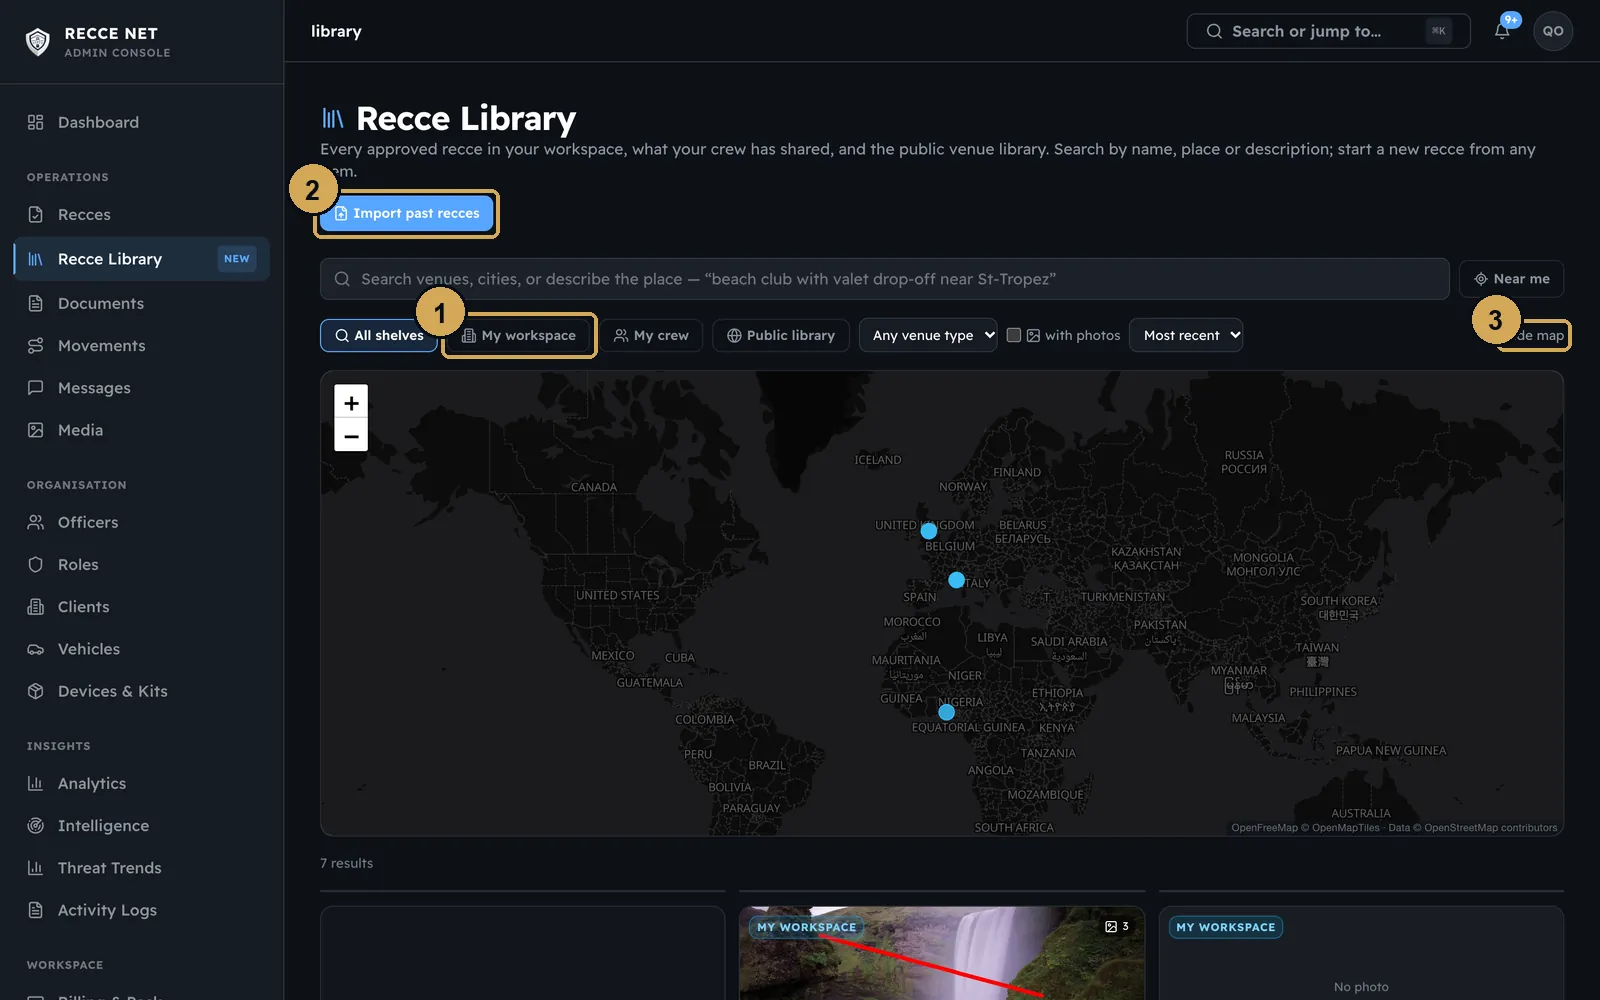
The Recce Library holds every approved recce in your workspace, the recces your crew has shared with you, and the public venue library. Search by name, place or description, view the results on a map, and start a new recce from any of them. Use Import past recces to bring in reports you wrote before Recce Net. Open the Library from the dashboard in the app, or from the console menu.
 (opens the full-size screenshot)
The Recce Library: your approved recces, your crew’s shared ones and the public library.
- 1: Shelves
- 2: Import past reports
- 3: Map view
Country reports and travel briefs
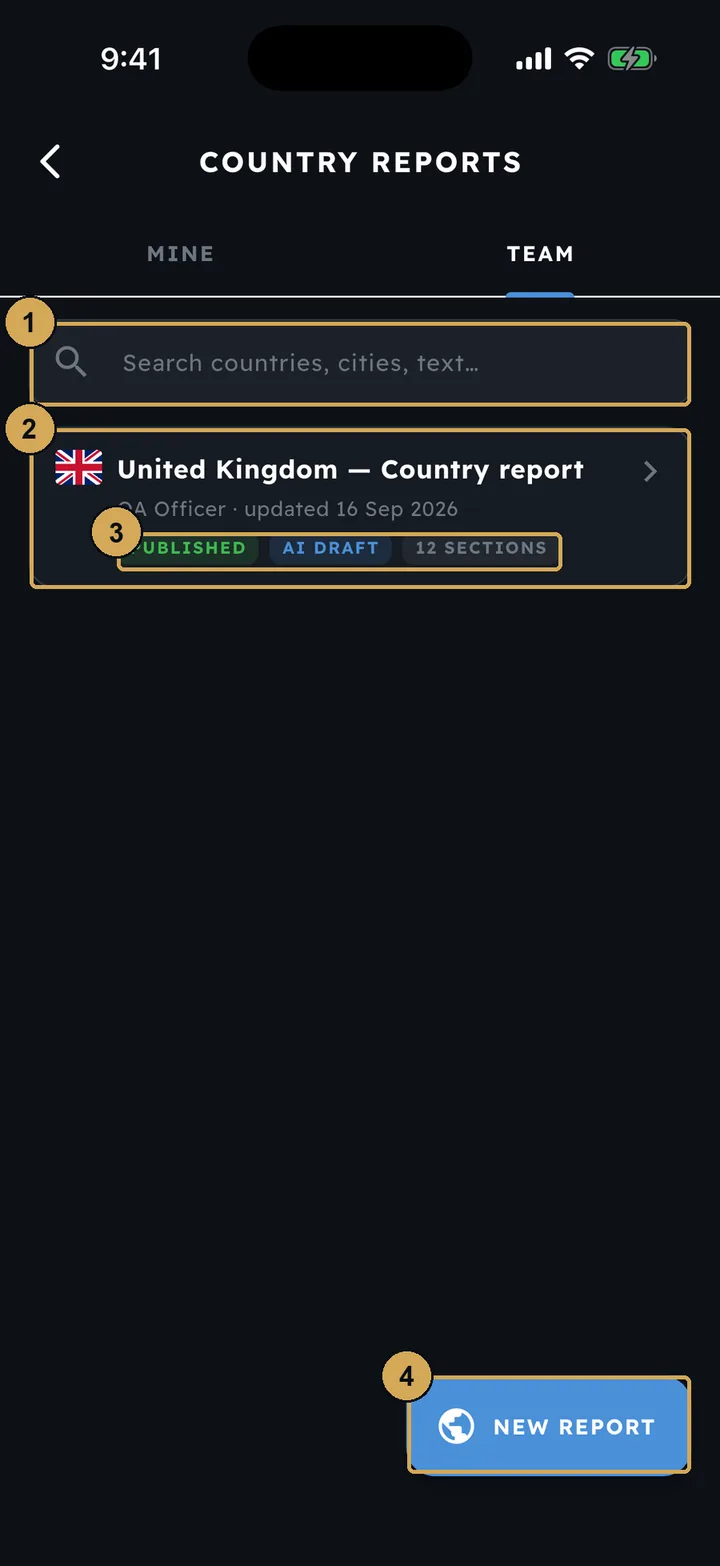
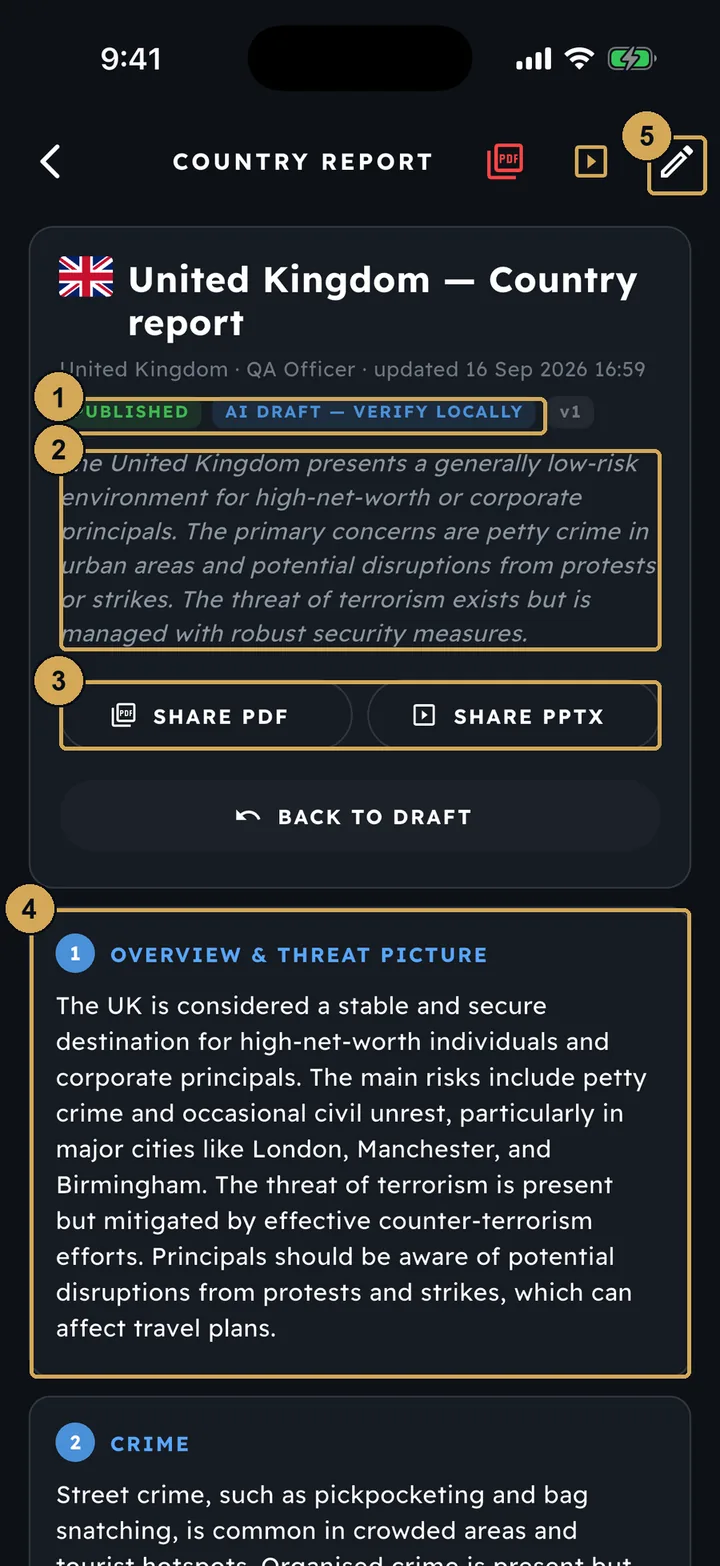
A country report sets out the security picture for a country. AI can write the draft, or you can import a past report, and then you publish it. Always check an AI draft against local knowledge. You can share a published report as a PDF or a PowerPoint.
 (opens the full-size screenshot)
Country reports: the security picture for a country, drafted by AI or imported.
- 1: Search countries, cities or text
- 2: A published team country report
- 3: Status, AI draft and number of sections
- 4: Start a new report
 (opens the full-size screenshot)
A published report. Share it as a PDF or PowerPoint from the top of the page.
- 1: Published, AI draft – verify locally
- 2: Summary for the country
- 3: Share as PDF or PowerPoint
- 4: Numbered report sections
- 5: Edit the report
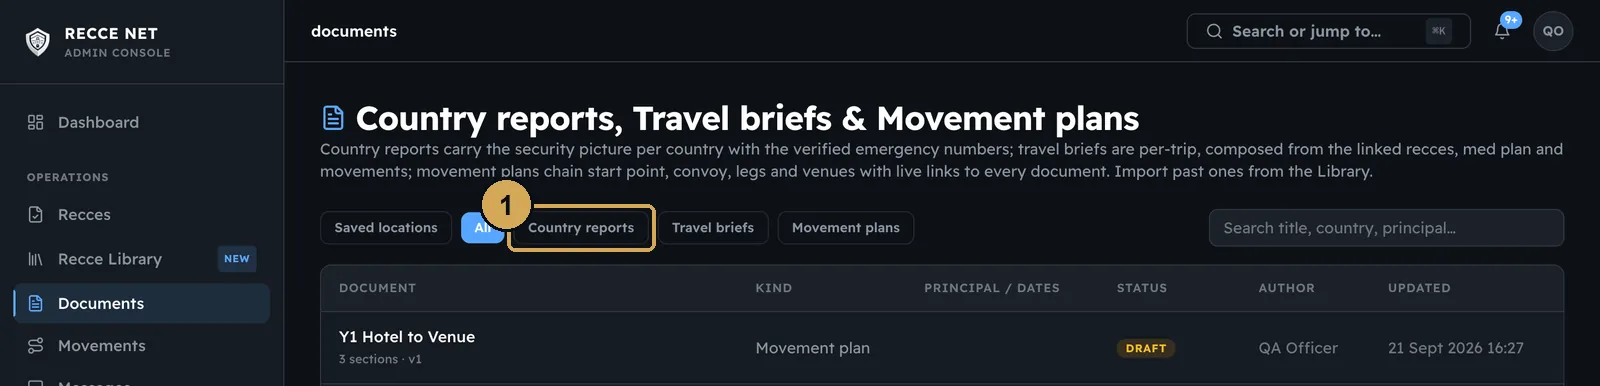
A travel brief covers a single trip. It is built from the recces, med plan and movements linked to that trip. Open travel briefs from the dashboard tile. In the console, country reports, travel briefs and movement plans are kept together under Documents.
 (opens the full-size screenshot)
Country reports, travel briefs and movement plans side by side in the console.
- 1: Filter by document type
Med plans
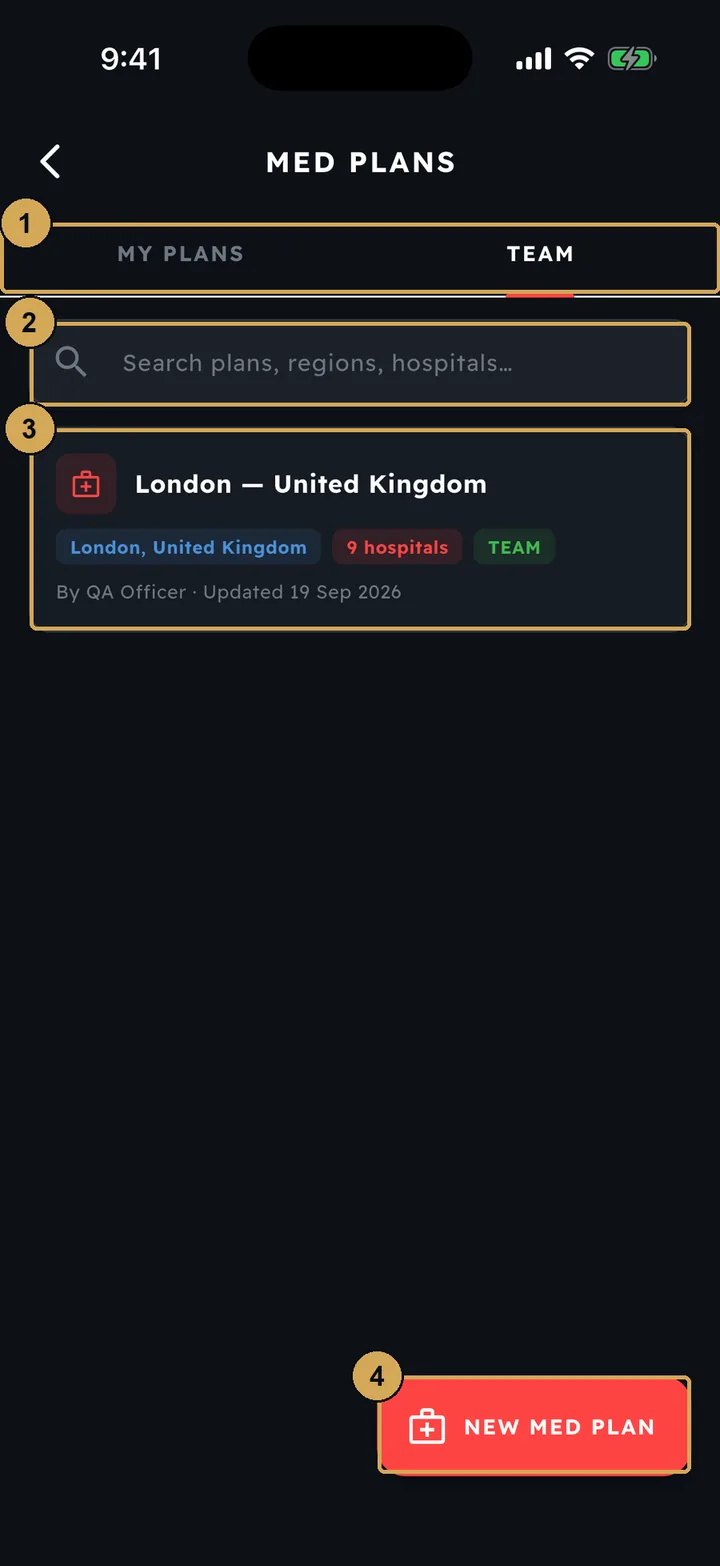
Med Plans holds your own medical plans and the ones your team has shared. Each plan covers one or more regions, with a medical emergency guide and the receiving hospitals.
 (opens the full-size screenshot)
Med Plans: your own and your team’s medical plans.
- 1: My plans or the team’s plans
- 2: Search plans, regions, hospitals
- 3: A team med plan with its hospitals
- 4: Create a new med plan
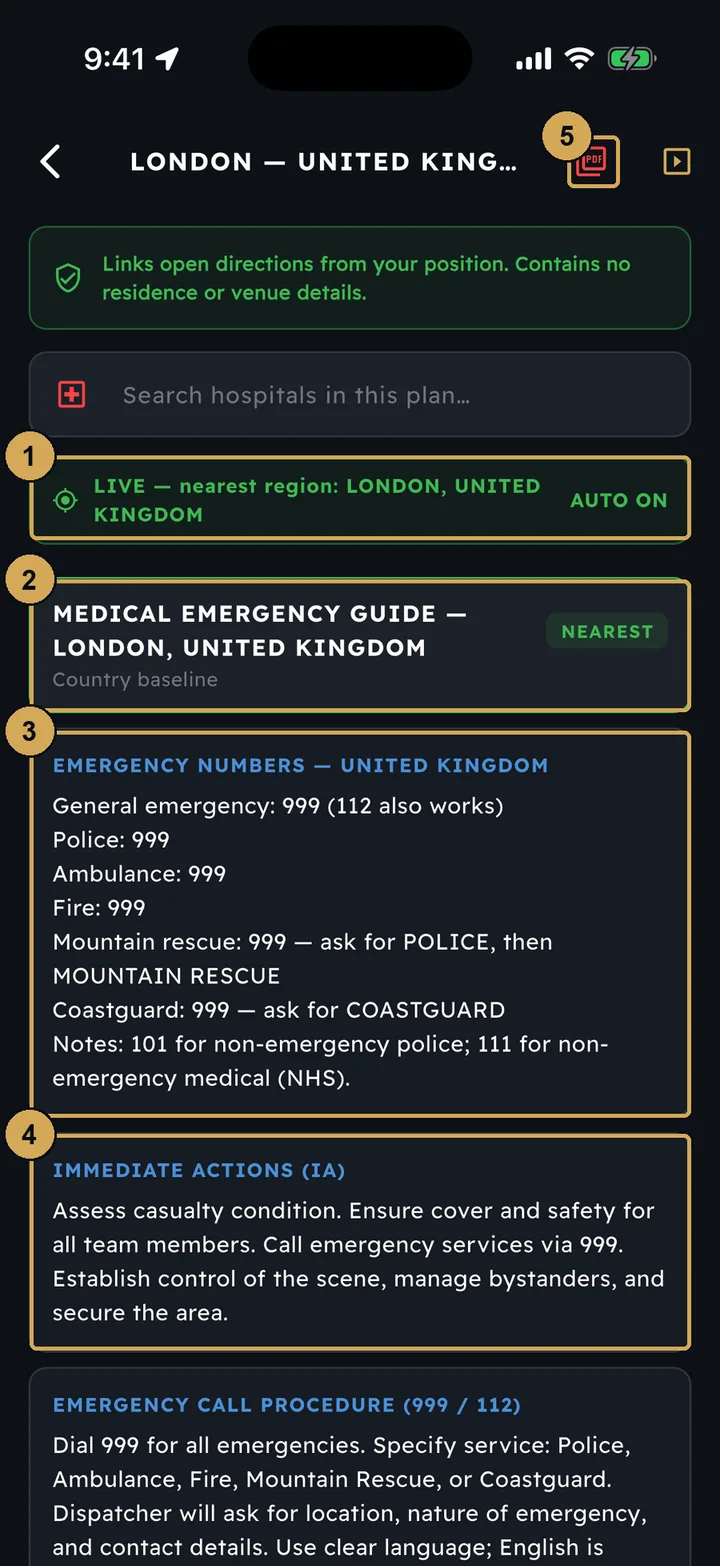
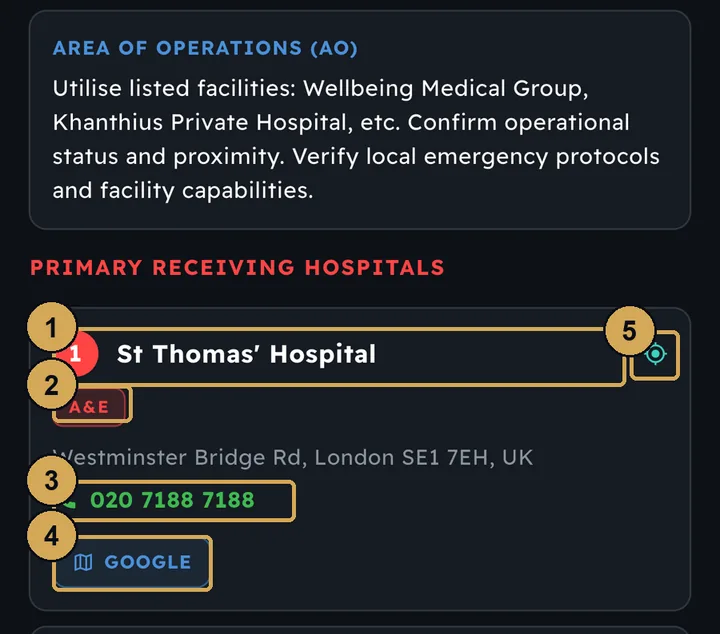
When you open a plan, the region nearest to you is picked automatically. You get the country’s emergency numbers, the immediate actions and the call procedure. The hospitals are listed in priority order, each with its type of care, a number to tap and call, and directions from where you are.
 (opens the full-size screenshot)
Open a plan and the nearest region is picked for you, with the numbers to call.
- 1: Nearest region picked from your position
- 2: The medical emergency guide for the region
- 3: Emergency numbers for the country
- 4: Immediate actions
- 5: Export the plan as a PDF
 (opens the full-size screenshot)
Receiving hospitals in priority order: call or get directions in one tap.
- 1: Hospital in priority order
- 2: Type of care, e.g. A&E
- 3: Tap to call
- 4: Directions from your position
- 5: Show it on the map
Intelligence
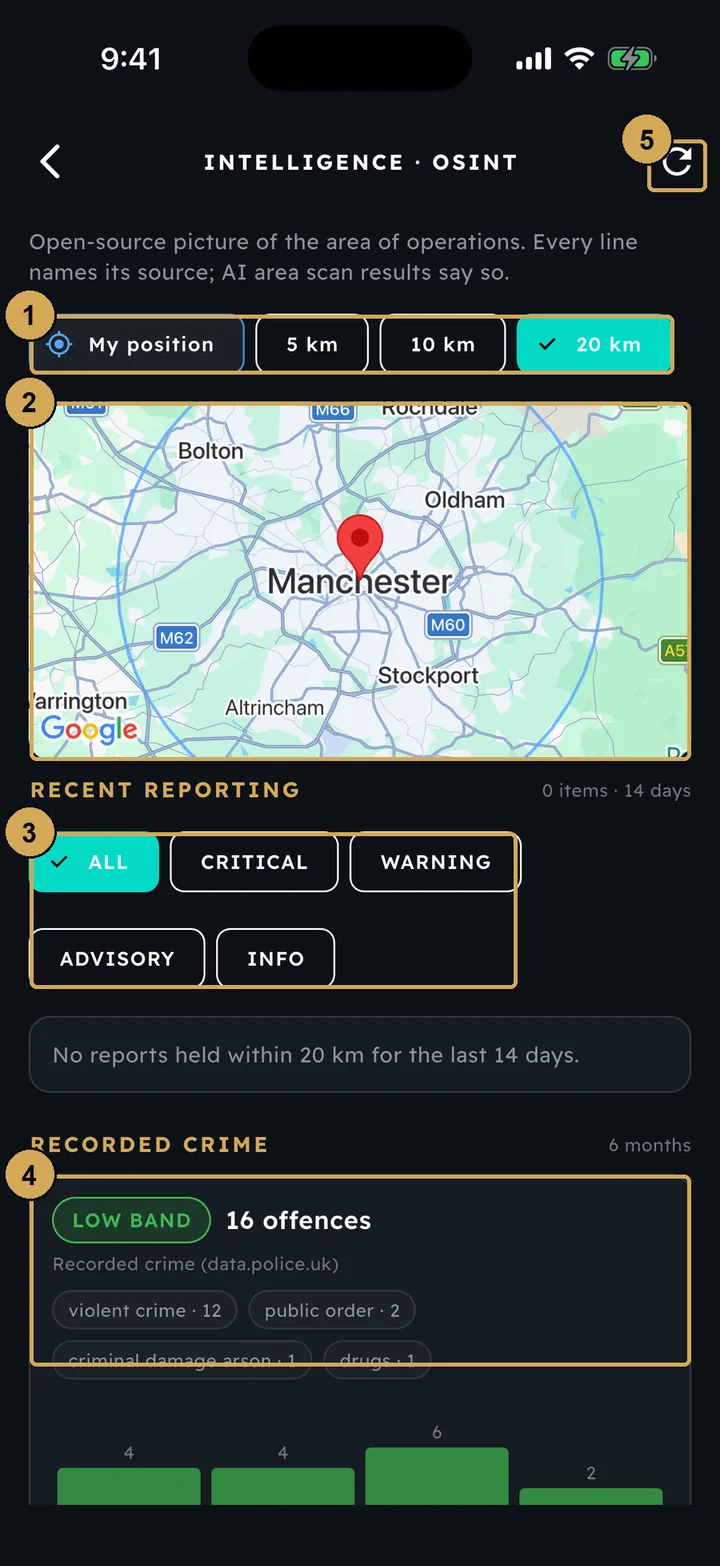
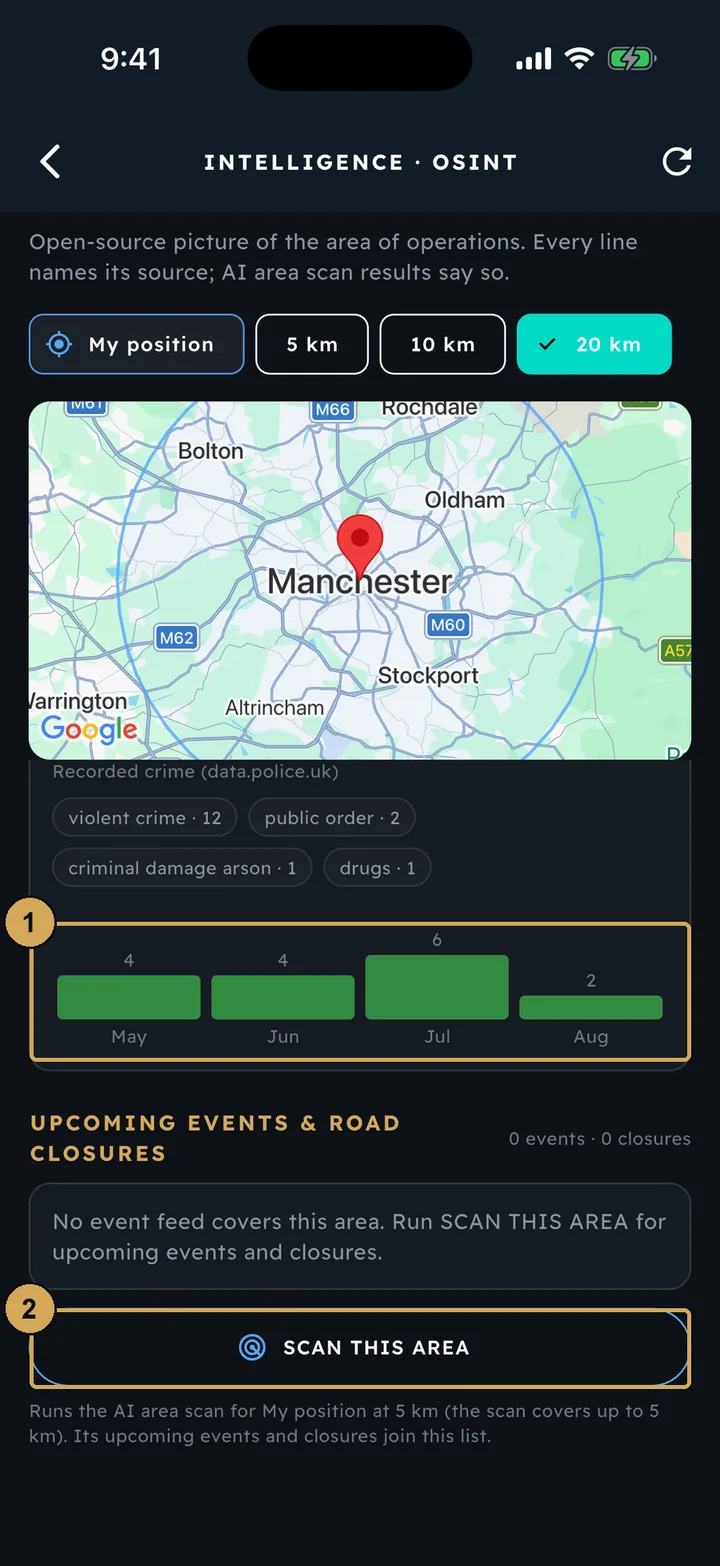
Intelligence shows open-source reporting for the area around you: recent news, recorded crime and events or road closures. Each line names its source. Below that are the six-month crime trend and Scan This Area, which runs an AI scan of up to 5 km around you.
 (opens the full-size screenshot)
Intelligence: open-source reporting and recorded crime around you, each line with its source.
- 1: Search radius around your position
- 2: Area of operations on the map
- 3: Filter reporting by severity
- 4: Recorded crime for the area, with its source
- 5: Refresh
 (opens the full-size screenshot)
The six-month crime trend and an AI scan of up to 5 km around you.
- 1: Monthly recorded-crime trend
- 2: Run an AI scan of this area
Devices & kit
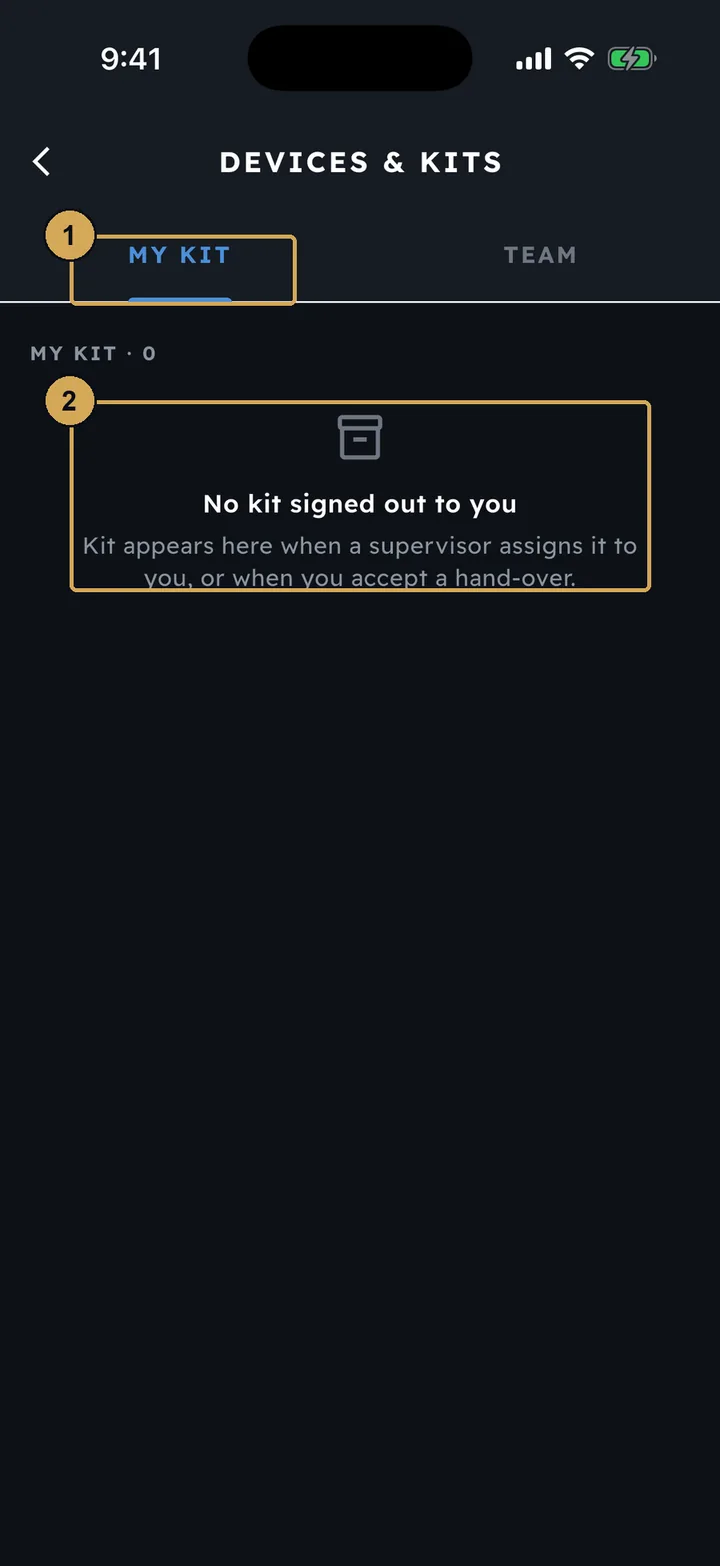
Devices & Kits (in the side menu) lists the equipment signed out to you. Kit appears there when it is assigned to you, or when you accept a hand-over from someone else. Kit is added in the console.
 (opens the full-size screenshot)
My Kit lists the equipment signed out to you (empty in our demo workspace).
- 1: My Kit – equipment signed out to you
- 2: Kit arrives by assignment or accepted hand-over
Settings
Further down your profile you can:
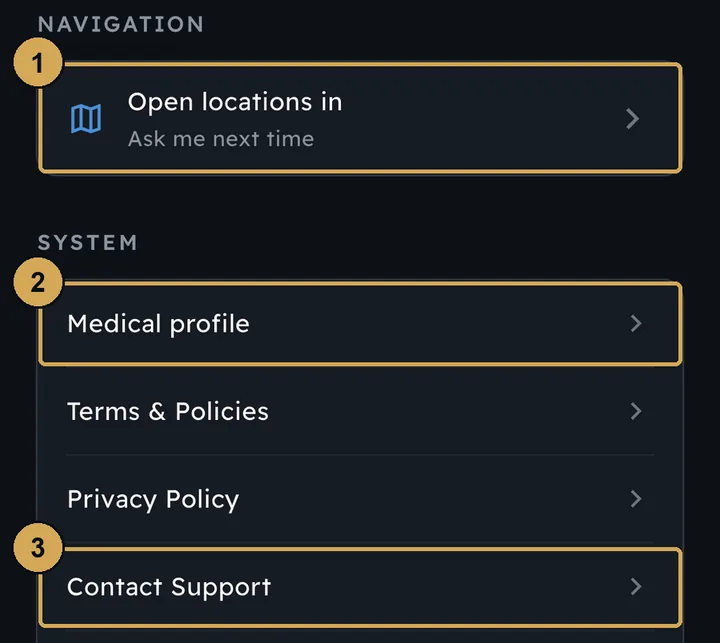
- choose which maps app opens when you tap a location;
- fill in your medical profile;
- read the terms and privacy notice, or contact support.
 (opens the full-size screenshot)
Choose your maps app, open your medical profile or contact support.
- 1: Choose the maps app for directions
- 2: Your medical profile
- 3: Contact support
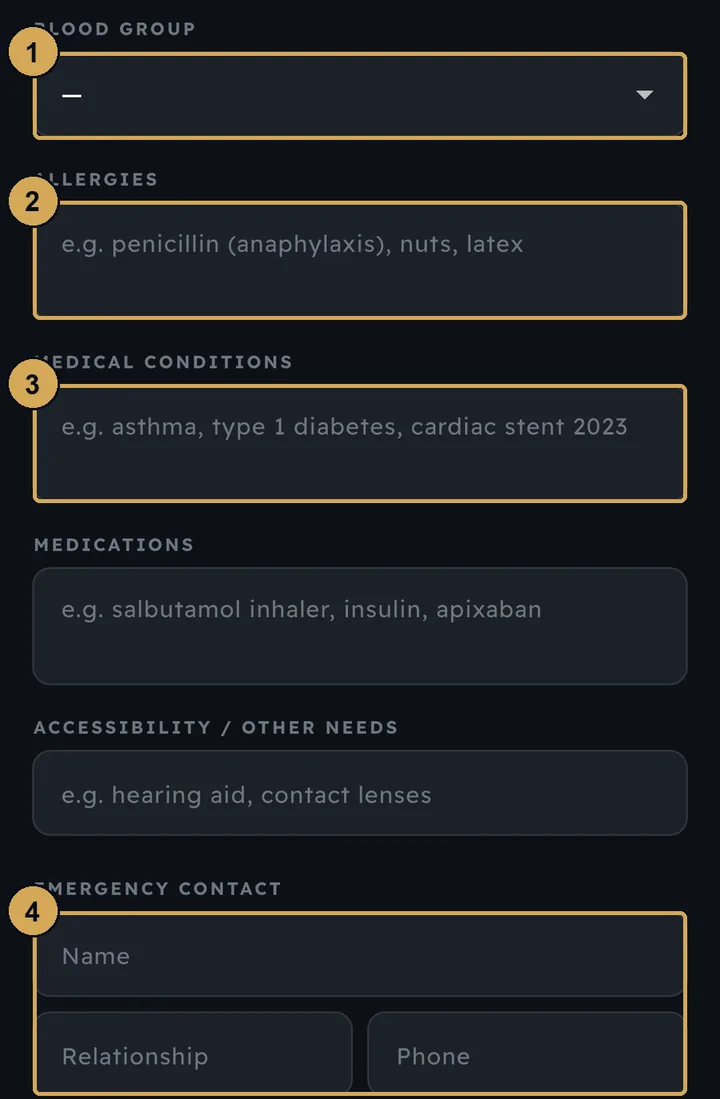
Your medical profile holds your blood group, allergies, conditions, medications, needs and an emergency contact. Your team reads it only if you need help.
 (opens the full-size screenshot)
Your medical profile, read by your team only if you need help.
- 1: Blood group
- 2: Allergies
- 3: Medical conditions
- 4: Emergency contact
Need a hand?
Email help@reccenet.com. The terms, privacy notice and account deletion are linked from the sign-in screen and from your profile.